Module 16 - Introduction to Test Equipment |
||||||||||||||||||||||||||||||||||||||||||||||||||
|
Module 16 − Introduction to Test Equipment Pages i, 1−1, 1−11, 1−21, 2−1, 2−11, 2−21, 3−1, 3−11, 3−21, 3−31, 4−1, 4−11, 4−21, 5−1, 5−11, 5−21, 5−31, 6−1, 6−11, 6−21, 6−31, 6−41, Index
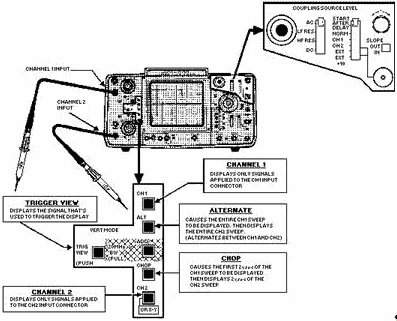
Figure 6-34. - Components to select vertical operating mode.
CH 1 and CH 2. - These controls allow you to display signals applied to either channel 1 or channel 2, as discussed earlier.
TRIGGER VIEW. - The TRIG VIEW allows you to display the signal that is actually used to trigger the display. (Triggering was discussed earlier.)
ALT. - The ALT (alternate) mode (figure 6-35) of obtaining a dual trace uses the techniques of GATING between sweeps. This control allows the signal applied to channel 1 to be displayed in its entirety; then, channel 2 is displayed in its entirety. This method of display is continued alternately between the two channels. At slow speeds, one trace begins to fade while the other channel is being gated. Consequently, the ALT mode is not used for slow sweep speeds. The CHOP mode, shown in figure 6-36 (explained next), will not produce a satisfactory dual sweep at high speeds. The ALT mode is deficient at low speeds. Therefore, both are used on dual-trace oscilloscopes to complement each other and give the scope a more dynamic range of operation.
6-31
Figure 6-35. - ALT (alternate) mode.
Figure 6-36. - CHOP mode.
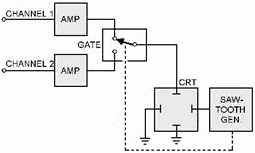
The output dc voltage references on each of the amplifiers are independently adjustable. Therefore, the beam will be deflected by different amounts on each channel if the voltage reference is different at each amplifier output. The output voltage from each amplifier is applied to the deflection plates through the gate. The gate is actually an electronic switch. In this application, it is commonly referred to as a BEAM Switch.
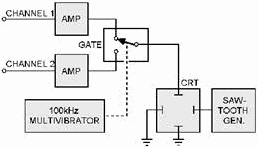
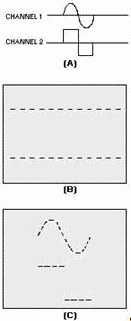
Switching is controlled by a high-frequency multivibrator in the CHOP mode. That is, the gate selects the output of one channel and then the other at a high-frequency rate (1200 kilohertz in most oscilloscopes). Because the switching time is very short in a good-quality oscilloscope, the resultant display is two sets of horizontally dashed lines, as shown in figure 6-37, view A.
6-32
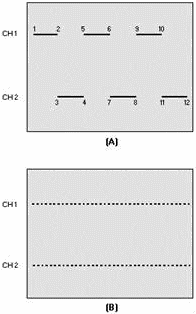
Figure 6-37. - Displaying CHOP mode.
Dashed line CH 1 is the output of one channel, while line CH 2 is the output of the other. The trace moves from left to right because of the sawtooth waveform applied to the horizontal plates. a more detailed analysis shows that the beam moves from CH 1 to CH 2 while the gate is connected to the output from one channel. Then, when the gate samples the output of the CH 2 during time 3 to 4, the beam is at a different vertical LOCATION. (This is assuming that CH 2 is at a different voltage reference.) The beam continues in the sequence 5 to 6, 7 to 8, 9 to 10, and 11 to 12 through the rest of one horizontal sweep. When the chopping frequency is much higher than the horizontal sweep frequency, the number of dashes will be very large. For example, if the chopping occurs at 100 kilohertz and the sweep frequency is 1 kilohertz, each horizontal line would then appear as a series of closely spaced dots, as shown in figure 6-37 view B. As the sweep frequency becomes lower compared to the chopping frequency, the display will show apparently continuous traces; therefore, the CHOP mode is used at low sweep rates.
When signals are applied to the channel amplifiers (view a of figure 6-38), the outputs are changed according to the triggering signal (view B). The resultant pattern (view C) on the screen provides a time- base presentation of the signals of each channel.
6-33
Figure 6-38. - Dual-channel display in CHOP mode.
ADD. - The ADD switch (shown earlier in figure 6-34) algebraically adds the two signals of channels 1 and 2 together for display.
Other Dual-Trace Oscilloscope Controls
Most dual-trace oscilloscopes have both an a and B time base for horizontal sweep control. Notice in the upper right corner on our example scope (figure 6-34) the Coupling, SOURCE LEVEL, and SLOPE controls. These serve the same function as did those same controls in the a time-base section of the scope. The B time base is selected using the same a and B TIME/DIV control (pull out outer knob).
The use of the B time base is controlled by the HORIZ DIsPLAY section discussed earlier in the a time-base section. However, inexperienced technicians generally do not use a and B time bases together in the MIXED, a INTEN (intensified), and B D'LYD (delayed) settings. These controls are fully explained in the applicable technical manuals; therefore, we will not discuss the controls in this chapter. Figure 6-39 is a block diagram of a basic dual-trace oscilloscope without the power supplies.
6-34
Figure 6-39. - Basic dual-trace oscilloscope block diagram.
ACCESSORIES
The basic dual-trace oscilloscope has one gun assembly and two vertical channels. However, there are many variations. The horizontal sweep channels vary somewhat from equipment to equipment. Some have one time-base circuit and others have two. These two are interdependent in some oscilloscopes and in others they are independently controlled. Also, most modern general-purpose oscilloscopes are constructed of modules. That is, most of the vertical circuitry is contained in a removable plug-in unit, and most of the horizontal circuitry is contained in another plug-in unit.
The main frame of the oscilloscope is often adapted for many other special applications by the design of a variety of plug-in assemblies. This modular feature provides much greater versatility than in a single-trace oscilloscope. For instance, to analyze the characteristics of a transistor, you can replace the dual-trace, plug-in module with a semiconductor curve-tracer plug-in module.
Other plug-in modules available with some oscilloscopes are high-gain, wide-bandwidth amplifiers; differential amplifiers; spectrum analyzers; physiological monitors; and other specialized units. Therefore, the dual-trace capability is a function of the type of plug-in unit that is used with some oscilloscopes.
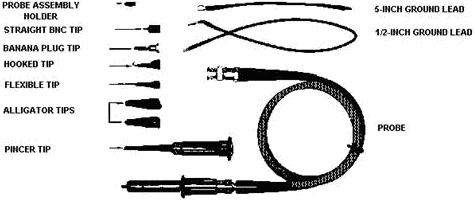
To get maximum usefulness from an oscilloscope, you must have a means of connecting the desired signal to the oscilloscope input. Aside from cable connections between any equipment output and the oscilloscope input, a variety of probes are available to assist in monitoring signals at almost any point in a circuit. The more common types include 1-to-1 PROBES, ATTENUATION PROBES, and CURRENT PROBES. Each of these probes may be supplied with several different tips to allow measurement of signals on any type of test point. Figure 6-40 shows some of the more common probe tips.
6-35
Figure 6-40. - Common probe tips.
In choosing the probe to use for a particular measurement, you must consider such factors as circuit loading, signal amplitude, and scope sensitivity.
The 1-to-1 probe offers little or no attenuation of the signal under test and is, therefore, useful for measuring low-level signals. However, circuit loading with the 1-to-1 probe may be a problem. The impedance at the probe tip is the same as the input impedance of the oscilloscope.
An attenuator probe has an internal high-value resistor in series with the probe tip. This gives the probe a higher input impedance than that of the oscilloscope. Because of the higher input impedance, the probe can measure high-amplitude signals that would overdrive the vertical amplifier if connected directly to the oscilloscope. Figure 6-41 shows a schematic representation of a basic attenuation probe. The 9-megohm resistor in the probe and the 1-megohm input resistor of the oscilloscope form a 10-to-1 voltage divider.
Figure 6-41. - Basic attenuation probe.
6-36 Since the probe resistor is in series, the oscilloscope input resistance is 10 megohms when the probe is used. Thus, using the attenuator probe with the oscilloscope causes less circuit loading than using a 1- to-1 probe.
Before using an attenuator probe for measurement of high-frequency signals or for fast-rising waveforms, you must adjust the probe compensating capacitor (C1) according to instructions in the applicable technical manual. Some probes will have an Impedance EQUALIZER in the end of the cable that attaches to the oscilloscope. The impedance equalizer, when adjusted according to manufacturer's instructions, assures proper impedance matching between the probe and oscilloscope. An improperly adjusted impedance equalizer will result in erroneous measurements, especially when you are measuring high frequencies or fast-rising signals.
More information on oscilloscope hook-ups can be found in Electronics Information Maintenance Books (EIMB), Test Methods and Practices.
Special current probes have been designed to use the electromagnetic fields produced by a current as it travels through a conductor. This type of probe is clamped around a conductor without disconnecting it from the circuit. The current probe is electrically insulated from the conductor, but the magnetic fields about the conductor induce a potential in the current probe that is proportional to the current through the conductor. Thus, the vertical deflection of the oscilloscope display will be directly proportional to the current through the conductor.
SPECTRUM ANALYZER
The spectrum analyzer is used to examine the frequency spectrum of radar transmissions, local oscillators, test sets, and any other equipment operating within its testable frequency range. With experience, you will be able to determine definite areas of malfunctioning components within equipment. Successful spectrum analysis depends on the proper operation of a spectrum analyzer and your ability to correctly interpret the displayed frequencies. Although there are many types of spectrum analyzers, we will use the Tektronix, Model 492 for our discussion.
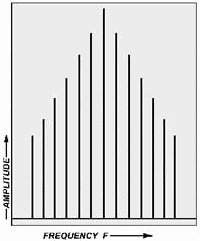
The spectrum analyzer accepts an electrical input signal and displays the frequency and amplitude of the signal on a CRT. On the vertical, or Y, axis, the amplitude is plotted. The frequency would then be found on the horizontal, or X, axis. The overall pattern of this display (figure 6-42) indicates the proportion of power present at the various frequencies within the spectrum (fundamental frequency with sideband frequencies).
6-37
Figure 6-42. - Spectrum analyzer pattern.
Basic FunctionAL DESCRIPTION
The model 492 analyzer can be divided into six basic sections, as follows:
· Display section;
· Digital control section; and
Converter Section
The converter section actually consists of three frequency converters, made up of a mixer, local oscillator (LO), and required filters. Only one frequency can be converted at a time and pass through the filters to reach the next converter. The analysis frequency can, however, be changed by altering the frequency of the LO and adjusting the Frequency control knob.
First CONVERTER. - The first (front end) converter changes the input signal to a usable IF signal that will either be 829 MHz or 2072 MHz. The IF signal to be produced is dependent on which measurement band selection is currently being used. The 829 MHz IF signal will be selected for bands 2 through 4, while the 2072 MHz IF signal is selected for bands 1 and 5 through 11.
Q-18. The first converter is also known by what other name?
6-38 SECOND CONVERTER. - The second converter actually contains two converters. Only one of these two converters in this section is ever operational, and selected as a result of the measurement band currently being used. The selected converter will convert the frequency received from the first converter to a usable (110 MHz) IF signal, which is then provided to the third converter.
THIRD CONVERTER. - This converter takes the 110 MHz IF signal, amplifies it, and then converts it to the final IF of 10 MHz. This signal, in turn, is then passed on to the IF section.
IF Section
The IF section receives the final IF signal and uses it to establish the system resolution by using selective filtering. System resolution is selected under microcomputer control among five bandwidths (1 MHz, 100 kHz, 10 kHz, 1 kHz, and 100 Hz). The gain for all bands are then leveled and logarithmically amplified. This is done so that each division of signal change on the CRT display remains equal in change to every other division on the CRT. For example, in the 10-dB-per-division mode, each division of change is equal to a 10 dB difference, regardless of whether the signal appears at the top or bottom of the CRT. The signal needed to produce the video output to the display section is then detected and provided.
Display Section
The display section provides a representative display of the input signal on the CRT. It accomplishes this by performing the following functions:
· Receives character data information and generates CRT plate drive signals to display alpha and numeric characters on the CRT;
The vertical deflection of the beam is increased as the output of the amplitude detector increases. The horizontal position is controlled by the frequency control section and is the frequency analyzed at that instant. The beam sweeps from left to right, low to high frequencies during its analysis. During this analysis, any time a signal is discovered, a vertical deflection will show the strength of the signal at the horizontal position that is the frequency. This results in a display of amplitude as a function of frequency.
Frequency Control Section
The frequency control section accomplishes the tuning of the first and second LOs within the converter section. The frequency immediately being analyzed is controlled by the current frequencies of the LOs. To analyze another frequency, you must change an LO frequency to allow the new frequency to be converted to a 10 MHz signal by the converter section. Periodically, the unit sweeps and analyzes a frequency range centered on the frequency set by the Frequency knob. Adjusting the Frequency knob will cause the LOs to be tuned to the new frequency. Only the LOs of the first two converters can be changed to vary the frequency being analyzed.
6-39 Digital Control Section
All the internal functions are controlled from the front panel through the use of a built-in microcomputer. The microcomputer uses an internal bus to receive or produce all communication or control to any section of the analyzer.
Power and Cooling Section
The main power supply provides almost all the regulated voltages required to operate the unit. The display section provides the high voltage necessary for CRT operation.
The cooling system allows fresh cool air to be routed to all sections of the unit in proportion to the heat that is generated by each section.
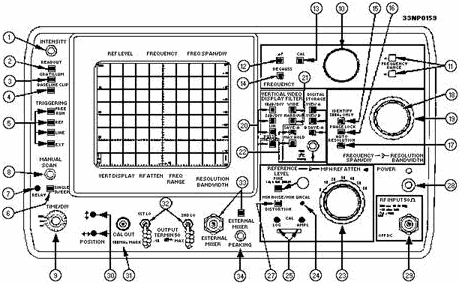
SPECTRUM ANALYZER FRONT PANEL CONTROLS, INDICATORS, and CONNECTORS
This section will describe the function of the front panel controls, indicators, and connectors. For a complete description of each function, refer to table 6-1 while reviewing the front panel in figure 6-43. The numbers located in column 1 of table 6-1 equate to the same numbers found on the front panel of figure 6-43. Because most operational functions of this spectrum analyzer are microprocessor-controlled, they are switch-selected rather than adjusted.
Figure 6-43. - Spectrum analyzer front panel controls, indicators, and connectors.
6-40
|
||||||||||||||||||||||||||||||||||||||||||||||||||