Module 3 - Introduction to Circuit Protection, Control, and Measurement
|
||||||||||||||||||||||||||||||||||||||||||||||||||||||||||||||||||
|
Module 3 −− Introduction to Circuit Protection, Control, and Measurement
Pages i, 1−1, 1−11, 1−21, 1−31, 1−41, 1−51, 1−61, 1−71, 2−1, 2−11, 1−21, 2−31, 2−41, 3−1, 3−11, 3−21, 3−31, AI−1, AII−1, AIII−1, IV−1, Index Module 3 - Introduction to Circuit Protection, Control, and Measurement: Ammeters
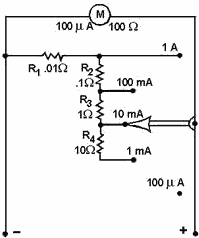
Figure 1-22 - An ammeter with internal shunt resistors. Chapter 1: Pages 1−21 through 1−30 By adding several shunt resistors in the meter case, with a switch to select the desired resistor, the ammeter will be capable of measuring several different maximum current readings or ranges. Most meter movements in use today have sensitivities of from 5 microamperes to 1 milliampere. Figure 1-22 shows the circuit of meter switched to higher ranges, the shunt an ammeter that uses a meter movement with a sensitivity of 100 microamperes and shunt resistors. This ammeter has five ranges (100 microamperes; 1, 10, and 100 milliamperes; 1 ampere) selected by a switch. With the switch in the 100 microampere position, all the current being measured will go through the meter movement. None of the current will go through any of the shunt resistors. If the ammeter is switched to the 1 milliampere position, the current being measured will have parallel paths of the meter movement and all the shunt resistors (R1 , R2, R3, and R4). Now, only a portion of the current will go through the meter movement and the rest of the current will go through the shunt resistors. When the meter is switched to the 10-milliampere position (as shown in fig. 1-22), only resistors R1, R2, and R3 shunt the meter. Since the resistance of the shunting resistance is less than with R4 in the circuit (as was the case in the 1-milliampere position), more current will go through the shunt resistors and less current will go through the meter movement. As the resistance decreases and more current goes through the shunt resistors. As long as the current to be measured does not exceed the range selected, the meter movement will never have more than 100 microamperes of current through it. Shunt resistors are made with close tolerances. That means if a shunt resistor is selected with a resistance of .01 ohms (as R1 in fig. 1-22), the actual resistance of that shunt resistor will not vary from that value by more than 1 percent. Since a shunt resistor is used to protect a meter movement and to allow accurate measurement, it is important that the resistance of the shunt resistor is known very accurately. The shunt resistors are inside the meter case and selected by a switch. For limited current ranges (below 50 amperes), internal shunts are most often employed.
Figure 1-23 - An ammeter employing the d'Arsonval principle and external shunts. For higher current ranges (above 50 amperes) ammeters that use external shunts are used. The external shunt resistor serves the same purpose as the internal shunt resistor. The external shunt is connected in series with the circuit to be measured and in parallel with the ammeter. This shunts (bypasses) the ammeter so only a portion of the current goes through the meter. Each external shunt will be marked with the maximum current value that the ammeter will measure when that shunt is used. Figure 1-23 shows an ammeter that is designed to use external shunts and a d'Arsonval meter movement. Figure 1-23(A) shows the internal construction of the meter and the way in which the external shunt is connected to the meter and to the circuit being measured. Figure 1-23(C) shows some typical external shunts. A shunt resistor is nothing more than a resistor in parallel with the meter movement. To measure high currents, very small resistance shunts are used so the majority of the current will go through the shunt. Since the total resistance of a parallel circuit (the meter movement and shunt resistor) is always less than the resistance of the smallest resistor, as an ammeter's range is increased, its resistance decreases. This is important because the load resistance of high-current circuits is smaller than the load resistance of low-current circuits. To obtain accurate measurements, it is necessary that the ammeter resistance be much less than the load resistance, since the ammeter is connected in series with the load.
Q20. What electrical property does an ammeter measure? Q21. How is an ammeter connected to the circuit under test? Q22. How does an ammeter affect the circuit being measured? Q23. How is the ammeter's effect on the circuit being measured kept to a minimum? Q24. What is ammeter sensitivity? Q25. What is used to allow an ammeter to measure different ranges? Range Selection
Figure 1-24 - Reading an ammeter at various ranges. Part of the correct use of an ammeter is the proper use of the range selection switch. If the current to be measured is larger than the scale of the meter selected, the meter movement will have excessive current and will be damaged. Therefore, it is important to always start with the highest range when you use an ammeter. If the current can be measured on several ranges, use the range that results in a reading near the middle of the scale. Figure 1-24 illustrates these points. Figure 1-24(A) shows the initial reading of a circuit. The highest range (250 milliamperes) has been selected and the meter indication is very small. It would be difficult to properly interpret this reading with any degree of accuracy. Figure 1-24(B) shows the second reading, with the next largest range (50 milliamperes). The meter deflection is a little greater. It is possible to interpret this reading as 5 milliamperes. Since this approximation of the current is less than the next range, the meter is switched as shown in figure 1-24(C). The range of the meter is now 10 milliamperes and it is possible to read the meter indication of 5 milliamperes with the greatest degree of accuracy. Since the current indicated is equal to (or greater than) the next range of the ammeter (5 milliamperes), the meter should NOT be switched to the next range. Ammeter Safety Precautions When you use an ammeter, certain precautions must be observed to prevent injury to yourself or others and to prevent damage to the ammeter or the equipment on which you are working. The following list contains the MINIMUM precautions to observe when using an ammeter. • Ammeters must always be connected in series with the circuit under test. • Always start with the highest range of an ammeter. • Deenergize and discharge the circuit completely before you connect or disconnect the ammeter. • In dc ammeters, observe the proper circuit polarity to prevent the meter from being damaged. • Never use a dc ammeter to measure ac. • Observe the general safety precautions of electrical and electronic devices.
Q26. Why should you use the highest range of an ammeter for the initial measurement? Q27. What range of an ammeter is selected for the final measurement? Q28. List the six safety precautions for the use of ammeters. Q29. Why will an ammeter be damaged if connected in parallel with the circuit to be measured?
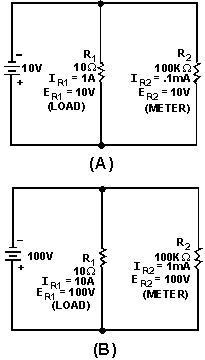
Figure 1-25 - Current and voltage in series and parallel circuits. Voltmeters All the meter movements discussed so far react to current, and you have been shown how ammeters are constructed from those meter movements. It is often necessary to measure circuit properties other than current. Voltage measurement, for example, is accomplished with a VOLTMETER. Voltmeters Connected in Parallel While ammeters are always connected in series, voltmeters are always connected in parallel. Figure 1-25 (and the following figures) use resistors to represent the voltmeter movement. Since a meter movement can be considered as a resistor, the concepts illustrated are true for voltmeters as well as resistors. For simplicity, dc circuits are shown, but the principles apply to both ac and dc voltmeters. Figure 1-25(A) shows two resistors connected in parallel. Notice that the voltage across both resistors is equal. In figure 1-25(B) the same resistors are connected in series. In this case, the voltage across the resistors is not equal. If R1 represents a voltmeter, the only way in which it can be connected to measure the voltage of R2 is in parallel with R2, as in figure 1-25(A). Loading Effect A voltmeter has an effect on the circuit being measured. This is called LoadING the circuit. Figure 1-26 illustrates the loading effect and the way in which the loading effect is kept to a minimum. In figure 1-26(A), a series circuit is shown with R1 equaling 15 ohms and R2 equaling 10 ohms. The voltage across R2 (ER2) equals 10 volts. If a meter (represented by R3) with a resistance of 10 ohms is connected in parallel with R2, as in figure 1-26(B), the combined resistance of R2 and R3 (Rn) is equal to 5 ohms. The voltage across R2 and R3 is now 6.25 volts, and that is what the meter will indicate. Notice that the voltage across R1 and the circuit current have both increased. The addition of the meter (R3) has loaded the circuit.
Figure 1-26 - The loading effect. In figure 1-26(C), the low-resistance meter (R3) is replaced by a higher resistance meter (R 4) with a resistance of 10 kilohms. The combined resistance of R2 and R4 (Rn) is equal to 9.99 ohms. The voltage across R2 and R 4 is now 9.99 volts, the value that will be indicated on the meter. This is much closer to the voltage across R2, with no meter (R3 or R4) in the circuit. Notice that the voltage across R, and the circuit current in figure 1-26(C) are much closer to the values in 1-26(A). The current (IR4) through the meter (R4) in figure 1-26(C) is also very small compared to the current (IR2) through R 2. In figure 1-26(C) the meter (R4) has much less effect on the circuit and does not load the circuit as much. Therefore, a voltmeter should have a high resistance compared to the circuit being measured, to minimize the loading effect.
Q30. What electrical quantity is measured by a voltmeter? Q31. How is a voltmeter connected to the circuit to be measured? Q32. What is the loading effect of a voltmeter? Q33. How is the loading effect of a voltmeter kept to a minimum? Making a Voltmeter from a Current Sensitive Meter Movement The meter movements discussed earlier in this chapter have all reacted to current. Various ways have been shown in which these movements can be used in ammeters. If the current and resistance are known, the voltage can be calculated by the formula E = IR. a meter movement has a known resistance, so as the movement reacts to the current, the voltage can be indicated on the scale of the meter. In figure 1-27(A), a voltmeter (represented by R2) connected across a 10-ohm resistor with 10 volts applied. The current through the voltmeter (R2) is .1 milliamperes. In figure 1-27(B), the voltage is increased to 100 volts. Now, the current through the voltmeter (R2) is 1 milliampere. The voltage has increased by a factor of 10 and so has the current. This illustrates that the current through the meter is proportional to the voltage being measured. Sensitivity of Voltmeters
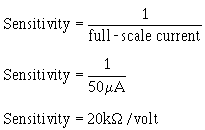
Figure 1-27 - Current and voltage in parallel circuit. Voltmeter sensitivity is expressed in ohms per volt (W/V). It is the resistance of the voltmeter at the full-scale reading in volts. Since the voltmeter's resistance does not change with the position of the pointer, the total resistance of the meter is the sensitivity multiplied by the full-scale voltage reading. The higher the sensitivity of a voltmeter, the higher the voltmeter's resistance. Since high resistance voltmeters have less loading effect on circuits, a high-sensitivity meter will provide a more accurate voltage measurement. To determine the sensitivity of a meter movement, you need only to divide 1 by the amount of current needed to cause full-scale deflection of the meter movement. The manufacturer usually marks meter movements with the amount of current needed for full-scale deflection and the resistance of the meter. With these figures, you can calculate the sensitivity
and the full-scale voltage reading full-scale current (full-scale current x resistance). For example, if a meter has a full-scale current of 50 μA and a resistance of and a resistance of 960 Ω, the sensitivity could be calculated as:
The full-scale voltage reading would be calculated as: Full-scale voltage reading = full-scale current x resistance Full-scale voltage reading 50 μA x 960 Ω Full-scale voltage reading = 48 mV Ranges
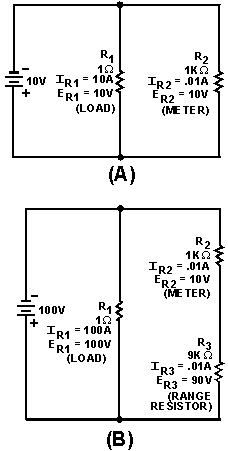
Table 1-1. - Meter Movement Characteristics Table 1-1 shows the figures for most meter movements in use today. Notice that the meter movements shown in table 1-1 will indicate .029 volts to .I volt at full scale, and the sensitivity ranges from 1000 ohms per volt to 200,000 ohms per volt. The higher sensitivity meters indicate smaller amounts of voltage. Since most voltage measurements involve voltage larger than .1 volt, a method must be used to extend the voltage reading. Figure 1-28 illustrates the method of increasing the voltage range of a voltmeter. In figure 1-28(A), a voltmeter with a range of 10 volts and a resistance of 1 kilohm (R2) is connected in parallel to resistor R1. The meter has .01 ampere of current (full-scale deflection) and indicates 10 volts. In figure 1-28(B), the voltage has been increased to 100 volts. This is more than the meter can measure. A 9 kilohm resistor (R3) is connected in series with the meter (R2). The meter (R 2) now has .01 ampere of current (full-scale deflection). But since R3 has increased the voltage capability of the meter, the meter indicates 100 volts. R3 has changed the range of the meter.
Figure 1-28. - a voltmeter and a range resistor.
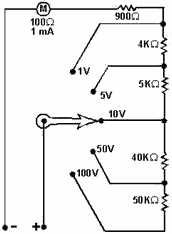
Figure 1-29. - a voltmeter with internal range resistors. Voltmeters can be constructed with several ranges by the use of a switch and internal resistors. Figure 1-29 shows a voltmeter with a meter movement of 100 ohms and 1 milliampere full-scale deflection with 5 ranges of voltage through the use of a switch. In this way a voltmeter can be used to measure several different ranges of voltage. The current through the meter movement is determined by the voltage being measured. If the voltage measured is higher than the range of the voltmeter, excess current will flow through the meter movement and the meter will be damaged. Therefore, you should always start with the highest range of a voltmeter and switch the ranges until a reading is obtained near the center of the scale. Figure 1-30 illustrates these points.
Posted July 26, 2021 |
||||||||||||||||||||||||||||||||||||||||||||||||||||||||||||||||||