|
July 1967 Popular Electronics
 Table of Contents Table of Contents
Wax nostalgic about and learn from the history of early electronics. See articles
from
Popular Electronics,
published October 1954 - April 1985. All copyrights are hereby acknowledged.
|
Even if you are not new
to electronics, there is a good chance that either you have not done much (or any)
soldering, or have never had proper instruction in the art. A nice hand-made solder
joint is truly a beauty to behold - at least to some of us. The qualities that make a
good solder connection are not really a matter of subjective preferences. Too little
solder creates a weak joint that might pull apart. Too much solder can cause
temperature gradients through the volume and across the surface to which results
in improper cooling. A glob of solder is more likely to harbor contaminants and/or
air pockets that can cause the joint to fail over time. When soldering, the attitude
of, "If a little solder makes a good joint, then a lot of solder must make a really
great joint," does not hold true. Other factors like overheating due to either
too hot of an iron or dwelling too long on a joint can over stress and potentially
ruin components and mounting surfaces (circuit board, terminal lug, etc.). The way in
which component leads and wires are attached to termination points also affects the
joint. High quality, reliable soldering is in some cases actually rocket science,
because NASA has its own specifications for how to solder equipment that goes into
its projects. I went through a two week NASA soldering course back in the 1980's
while working on Mil-Spec equipment at Westinghouse Electric's Oceanic Division in
Annapolis, Maryland. Re-qualification was required on a yearly basis. To this day I
try to apply what I learned when doing any type of soldering.
Electronic Soldering
 Do You Make Good Connections the First Time, Every
Time? Do You Make Good Connections the First Time, Every
Time?
By John McNarney
There is nothing difficult about soldering. Yet most kits returned to the manufacturer
and many home-built projects sent to the repair shop usually suffer from little more
than poor soldering. Although the bulk of all soldering troubles can be attributed to
cold soldered connections, there are also other types of soldering faults; heat damage,
short circuits, corrosion, etc.
Cold soldered junctions have different effects on a circuit. They can appear as open,
intermittent, high resistance and normal connections. They can fool you into thinking
that you have noisy and otherwise defective components.
It doesn't take much time or effort to learn and put into practice good soldering
habits. Nor does good soldering require any expensive tools or difficult-to-master skills.
If you stick to a few common sense rules, you will be able to produce well soldered connections.
Types of Soldering Tools. There are all kinds of non-specialized
soldering tools designed for general-purpose work. There are soldering irons (including
soldering pencils), soldering guns, and soldering pistols. They are all rated according
to electrical power consumption. High efficiency factors make it possible to disregard
losses and think of the wattage rating as heat power.
Heat power is either light duty (20 to about 50 watts), medium duty (50 to about 125
watts), or heavy duty (125 watts and higher). Manufacturers' duty ratings are often misleading,
however, since their designations are based on comparisons of the same types of soldering
tools. For example, some soldering guns may be designated as light-duty tools, even though
few - if any - guns develop less than 100 watts of heat power.
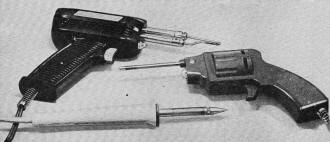
Clockwise from bottom, pencil soldering iron, transformer soldering
gun, and soldering pistol are most often used types of soldering tools. Each type of
tool is available with different heat power ratings plus a variety of specialized tip
configurations.

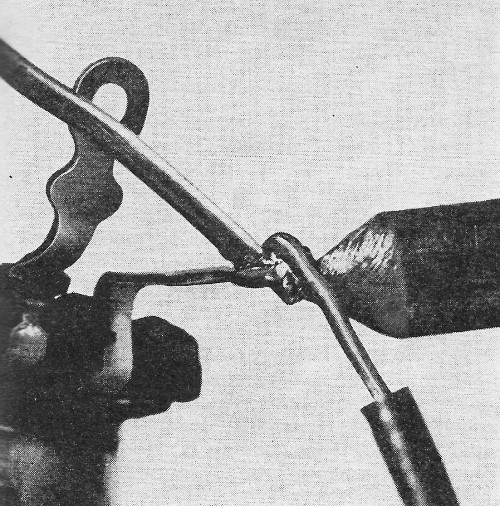
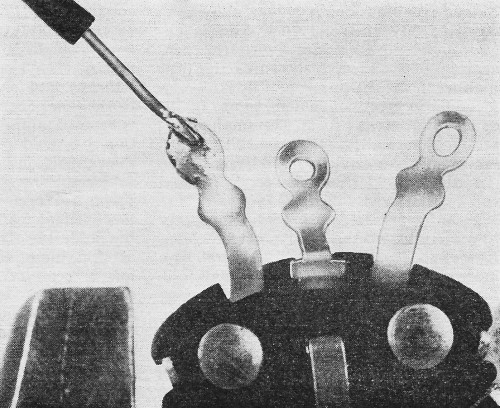
Heat and solder should be applied to opposite sides of connection
for best results. This allows solder to flow properly into and around joint. Use only
enough solder to insure a good, solid connection.
Soldering Irons. Soldering irons and pencils, taken as a group, are
characteristically lightweight and compact, weighing in at less than a half-pound, (without
power cord). These tools cost from as little as $1.50 up to about $20 for elaborate or
precision units and kits complete with special attachments.
The soldering iron and pencil are designed for constant use over a long period of
time and with a minimum amount of tip deterioration. As such, this type of tool is especially
adapted for extensive project work and kit building.
Soldering irons and pencils have a heat-generating device (resistance element) which
is electrically isolated from the soldering tip, but closely thermally coupled. The size
and weight of the tip affect the tool's initial heating and heat recovery times. Different
kinds of metal and a multitude of shapes and sizes are available. A simple copper tip
having one or more flat faces at the pointed end is generally used.
A new type of soldering iron, constructed in such a manner as to provide a selection
of different heat power ranges, has recently become popular among hobbyists. This type
of tool employs a separate step-down transformer, the secondary of which is tapped in
several places, to provide the correct amount of low voltage and high current for the
heat power range selected.
Soldering Guns. The soldering gun, because of its built-in transformer,
is a rather heavy and bulky device, but its unique pistol-like construction makes it
comfortable to use and easy to manipulate. Soldering guns can be purchased for from $4
to about $14.
The built-in transformer of the soldering gun provides low voltage and high current
directly to the tip. The tip appears to be a short circuit across the transformer's secondary,
and comes up to soldering temperature almost instantly.
Because of the instantaneous heating - and cooling - feature of the soldering gun,
this type of tool is often preferred for intermittent applications. It is also used by
those advocates of get in and get out fast with high heat to prevent damage to transistors
and other solid-state components.
Soldering Pistols. The soldering pistol has about the same shape
as the soldering gun. The pistol is a hybrid affair, combining features of both the soldering
iron and the soldering gun. For example, this type of tool employs both a heating element
and a step-down transformer, and its soldering tip resembles those found on many soldering
irons.
The step-down transformer serves the same basic function as in the soldering gun;
it provides a low voltage-high current source for almost instantaneous heat.
As a general rule, soldering irons and pencils are light- to medium-duty tools, soldering
guns are medium- to heavy-duty, and pistols can be obtained in either light-, medium-,
or heavy-duty units. Take your choice; but remember, the tool you do choose must be capable
of producing enough heat power to efficiently solder the connection in the shortest possible
time. This doesn't mean that the higher the power the better. On the contrary, excessively
high power tools are more likely to cause more damage in the hands of a person who doesn't
have experience in using them.
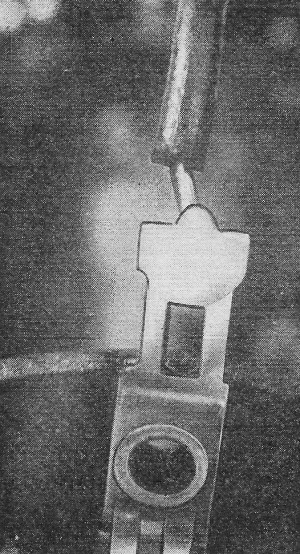
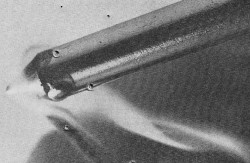
Photo show examples of good (above) and poorly (below) soldered connections.
Good connection is usually bright and smooth, while poorly soldered connection is more
often than not dull and grainy due to improper application of heat and/or solder.

Solders and Fluxes. Solder is simply a tin-lead alloy that flows
at a relatively low temperature (about 370°F). Because of this low melting temperature,
solder connections can be made quickly and economically.
Most solders are identified by their tin-to-lead combination. A solder alloy that
contains 60% tin and 40% lead is described as 60/40 solder - with the percentage of tin
always shown as the first number in the ratio.
Solder is most convenient to use in 16- or 18-gauge strand form. The small cross-sectional
area allows conservatively rated tools to make it flow quickly, and the quantity of solder
used for each terminal can be easily controlled.
In order for solder to adhere properly to a connection, the joint must be clean, free
of oxides, and properly heated. The most effective way to combat oxidation is to use
an oxide-reducing flux. However, solder flux will not remove dirt, grease, paint, etc.
Acid and chloride salt fluxes are highly corrosive and have no place in electronics.
Use a rosin-type flux for general-purpose soldering and an aluminum oxide-reducing flux
for soldering components to aluminum. (Yes, you can solder to some types of aluminum
alloys.)
Solder and fluxes are so closely related that solder manufacturers have combined the
two in precisely balanced proportions for general and specialized applications by fabricating
the solder so that it contains one or more cores of rosin flux.
How To Solder. The cardinal rule is to "keep it clean." That goes
for your soldering tools as well as for the connection to be soldered. If the soldering
tool you use is a pencil or iron that has a large copper tip, the tip must be coated
(tinned) with a thin film of solder to prevent deterioration resulting from oxidation.
Tinning also helps heat transfer from the tip to the work.
Even before you proceed to make a connection, the components and terminals to be soldered
must be clean. A dirty solder lug or component lead can be quickly cleaned by rubbing
it with medium-grade emery cloth or coarse steel wool.
Once the components and terminals to be soldered are cleaned, they are connected together
in such a way as to form a good electrical and mechanical joint. The unsoldered connection
should be electrically conductive and mechanically solid.
Heat-sink the leads of heat-sensitive components. (The heat sink can be a commercially
available item, the jaws of long-nose pliers, or even a paper clip in a pinch.) The heat
sink serves as a heat radiator and should be placed as close to the component as possible.
Finally, apply the heat to the connection to be soldered - not the solder! When the
connection is hot enough to cause the solder to flow, apply just enough of the solder
to form a thin coat. To improve the efficiency of the heat transfer from the soldering
tip to the terminal, or connection, many electronics enthusiasts allow a bead of solder
to form on the soldering tip. When this bead of solder "surrounds" the connection, heat
flows into the joint from "all" sides.
Remove the. solder feed first, then the heat, and do not allow the newly soldered
connection to move while the solder is in a mobile state. That's all there is to it.
Posted September 10, 2018
|