|
May 1960 Popular Electronics
 Table of Contents Table of Contents
Wax nostalgic about and learn from the history of early electronics. See articles
from
Popular Electronics,
published October 1954 - April 1985. All copyrights are hereby acknowledged.
|
If a kid built a Jacob's
Ladder type of high voltage spark machine today and took it to school, he would
probably be accused of bringing a lethal weapon onto the grounds. An FBI SWAT
team would subsequently storm his house at 5:00 in the morning and drag him and
his family members out onto the front lawn in their pajamas and conduct a
thorough search of the premises for other such weapons of mass destruction. The
mainstream media would all be there, having been tipped off by the Feds. In
the 1970s when I was in junior high school in Annapolis, Maryland, a couple
times a year one of us electrical tinkerers would show up with one to amaze and,
to be honest, scare fellow students. Mine was housed in a shoebox and was barely
powerful enough to generate a respectable climbing arc on a dry winter day.
This
"Tesla's Trickery" article appearing in a 1960 issue of Popular Electronics
magazine provides a description of a high voltage generator project and
instructions and photos for building one of your own. It is more complicated
than most of the ones out there, but if made carefully out of ornate wooden and
metal parts, it would make a really nice showpiece. If you make one, please send
me a picture of it for posting here.
Tesla's Trickery
 Famed inventor Nikola Tesla liked to startle
friends with his own brand of lightning. Build this tiny Tesla coil and you, too
can be an electronic trickster Famed inventor Nikola Tesla liked to startle
friends with his own brand of lightning. Build this tiny Tesla coil and you, too
can be an electronic trickster
By Kenneth Richardson
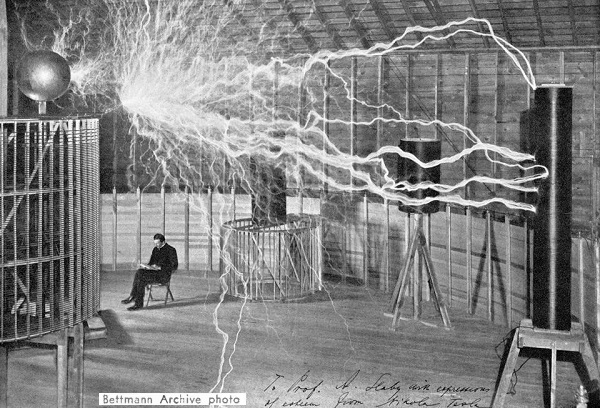
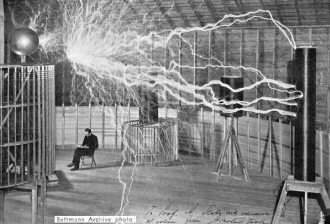
Nikola Tesla, father of artificial, lightning, often produced 48'-long lightning
bolts in his laboratory. He enjoyed demonstrating such pyrotechnics to unsuspecting
guests visiting his workshop. The exhibitions never failed to fill his guests with
so much awe that they had an instantaneous urge to. make for the nearest exit and
the safety of the out-of-doors.
Eccentric but highly imaginative Nikola Tesla was born in Yugoslavia,
studied in both Prague and Paris. He came to the U.S. in 1884 and found employment
,at photo Edison's laboratory near Orange, N. J. Shortly afterwards, he opened his
own laboratory in New York City. Among the first to find an application for alternating
current, Tesla patented the induction motor in 1888. Later, his ideas helped make
the Niagara Falls power project possible. He also developed new forms of dynamos,
transformers, induction coils, capacitors. a-c and incandescent lamps, and other
electrical devices. So striking was Tesla's effect on the electrical world that
his 80th birthday in 1936 was celebrated with forums and meetings throughout Europe.

Build this spark gap generator set.

Tesla spark generator set construction.

Tesla spark generator high voltage coil construction.
You can reproduce Tesla's feats on a smaller scale - and experiment with 20,000
volts - by building this simple Tesla coil. You'll amaze your friends with its eerie
purple glow and the multitude of tricks you'll be able to perform. The Tesla coil
72 has practical applications, too - you can use it for testing the vacuum in radio
tubes, for instance.
This miniature unit costs about ten dollars to build - even less if you have
a well - stocked junk box. Three parts must be homemade: the glass-plate capacitor
(C1), 1he spark gap (SGP1), and the Tesla transformer windings (L1 and L2). All
other parts are standard except the Ford spark coil (T1) which is available from
Polk's Model Craft Hobbies, 314 Fifth Ave., New York 1, N. Y., for $5.25, prepaid.
Auto ignition coil T2, auto radio vibrator VB1, and capacitor C2 can be used in
place of the spark coil as shown on the schematic diagram (page 76).
Construction
Assemble the parts on a plywood baseboard or a kitchen cutting board 8½"
x 12". Attach a banana jack to the baseboard in the center of the Tesla primary
so that it can be connected to the Tesla secondary. Use No. 14 insulated wire for
interconnecting wiring.
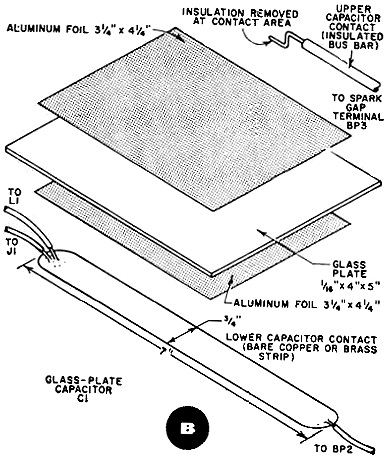
Capacitor C1 can be made from a 4" x 5" piece of glass 1/16" thick. Cement pieces
of aluminum .foil to both sides of the glass, using either quick-drying clear lacquer
or coil dope. The foil should be about 3¼" x 4¼". in order to leave
a margin of 3/8" around the glass plate.
Spark gap SGP1 consists of two metal rods held in binding posts so that the distance
between the rod ends can be adjusted. Mount the spark gap on a 2" x 4" x 1/2" plastic
or porcelain base.
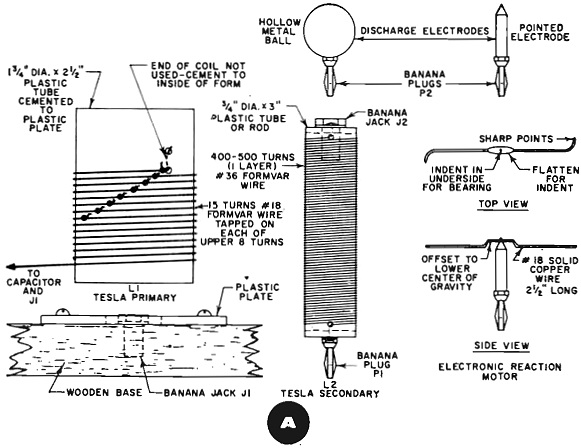
The Tesla transformer itself is made up of two windings. The primary is wound
on a tube which is then cemented to the baseboard. The secondary is wound on another
tube and is constructed so that it can be plugged in and out of the primary. This
makes it possible to experiment with various secondary windings at will.
For the Tesla primary, wind fifteen turns of No. 18 Formvar enameled copper wire
on a plastic or Bakelite tube about 1¾" in diameter and 2½" long.
A cylindrical plastic jar or pill bottle can also be used. Start winding near the
bottom end of the tube. Space the turns from each other by simultaneously winding
a string of about the same diameter as the wire between each turn. The upper eight
turns should each be wound with a projecting twist; the twists should be staggered
around the tube as shown. To keep the wire and string in place, paint or spray the
coil with clear quick-drying lacquer or coil dope.
Obtain a plastic tube or cylindrical plastic pill bottle about 3/4" in diameter
and at least 3" in length for the Tesla secondary. Close the tube ends with plastic
discs drilled for banana plugs and cut to fit the tube snugly. Attach plug P1 to
the bottom disc and jack J1 to the top disc and cement in place.
The Tesla secondary should be wound closely in one layer consisting of 400 to
500 turns of No. 36 Formvar wire spaced to fit on 2½" of the tube. Solder the wire
ends to J1 and P1 and cement the winding in place. Slip a 1" i.d. plastic tube
around L2 as shown in the pictorial to prevent corona discharge from L2's sides.
The power supply for the unit can consist of four Na 6 dry cells in series, or
a 6 -volt "hot -shot" battery, or any 6-volt storage battery. Or, instead of a battery,
a 10- to 12-volt transformer operating from the 117-volt a.c. line can be used-a
large chimes transformer is ideal. The higher voltage is needed for a.c. operation
to overcme T1's primary impedance. To make connections to T1 more easily, solder
three binding posts to T1's terminals (1, 2, and 3) as shown.
Adjustment
With the wiring completed, plug the Tesla secondary (L2) into jack J1 as is shown
on the pictorial diagram. May, 1960 Wiring the unit is simple once components are
assembled on 8½" x 12" breadboard (see pictorial, opposite page). Detail
"A" (below the pictorial) gives data on the Tesla transformer primary and secondary
windings L1 and L2. Detail "B" (left) shows how to construct glass-plate capacitor
C1. Wiring is point-to-point, using No. 14 insulated hookup wire. Adjust the length
of the spark gap (SGP1) to about 1/16" to 1/8". Then connect the alligator clip
from BP4 to one of L1's taps. Be sure that the upper wire on glass-plate capacitor
C1 is making good electrical contact; bend the wire if necessary. Open switch S1
and connect BP1 or BP2 to an a.c. or d.c. supply.
Now close switch S1. A steady stream of brilliant crackling sparks should appear
at spark coil T1 and spark gap SGP1. If there is no sparking at SGP1, adjust its
spacing to about 1/32". Be careful not to touch the spark gap or capacitor terminals
- you'll get a nasty but harmless shock if you. do. And you'd best keep small fry
at a safe distance.

Tesla spark generator capacitor construction.

Tesla spark generator set schematic.
Hold a piece of metal close to the Tesla discharge electrode. You should see
a small discharge taking place, perhaps 1/4" long. The discharge can be seen best
if room lighting is subdued or extinguished entirely. To adjust for maximum power,
turn the unit off and move the clip up or down turn by turn on primary winding L1,
testing after each adjustment. You'll eventually find the optimum position for the
clip. When the unit is working properly, sparks should leap a distance of about
an inch or an inch and a half to a bare finger or to a piece of metal held in the
hand.
Operation
For best results, place the unit in a pitch-dark room with the spectators gathered
closely around. Close switch S1 and you'll see a beautiful corona discharge from
the high-voltage electrode. The corona is caused by ionization of the surrounding
air due to the high-voltage, high-frequency discharge. After a few moments you'll
notice a pungent odor around the unit; this indicates formation of ozone, form of
oxygen generated by some commercial air purifiers.
Now hold a small fluorescent or neon lamp near the discharge electrode. It will
start glowing even when several inches away. Wave it rapidly and you'll see a series
of flashes in the lamp, one for each of the sparks occurring across the spark gap.
Shield the spark gap if its light interferes with viewing the discharge.
Try holding the glass part of an ordinary clear-glass 117-volt light bulb in
your hand while touching the metal base to the discharge electrode. Lightning-like
(but harmless) sparks will jump from the filament to your fingers. Also, a striking
blue or lavender-colored glow will appear inside the lamp due to its nitrogen content.
Radio tubes will glow blue if they are gassy; neon lamps will also light.
You can build a tiny "motor" that will spin at high speed when mounted on the
pointed discharge electrode (see Detail A). It reacts mechanically to the discharge
from the sharp points on the rotor (the discharge creates a sort of electronic "wind")
.
Posted January 27, 2022
|