|
May 1973 Popular Electronics
 Table of Contents Table of Contents
Wax nostalgic about and learn from the history of early electronics. See articles
from
Popular Electronics,
published October 1954 - April 1985. All copyrights are hereby acknowledged.
|
All oscilloscopes have some ability
to trigger the display sweep on the waveform being measured. Some models provide more
options than other to the user for controlling how the sweep is triggered - positive-going
edge, negative-going edge, high or low repetition rate, frequency, specific voltage level,
from the AC line, or even from an external source. Without control over the trigger source,
repetitive waveforms would be "walking" across the screen, random signals and very long
interval signals would be missed, and complex signals would be a garbled mess. This article
gives an introduction on how oscilloscope triggering circuits are implemented and ways
to use them.
This "Scope-Trace Quiz"
from a 1965 issue of Popular Electronics will make a compliment to this article.
Understanding Your Triggered Sweep Scope
A Brief Explanation of Those Puzzling Trigger Controls
By Virgil A. Thomason
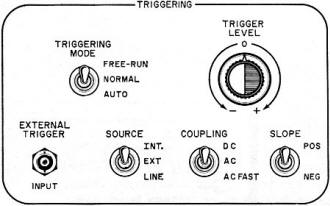
Fig. 1 - Basic trigger controls for typical o-scope. Particular markings
may differ from one scope to another but the principle is the same.
Most technicians and electronics enthusiasts are familiar with the theory behind a
triggered sweep scope. Others, however, still seem to be troubled by the special triggering
controls used in this type of scope. Let's see if we can't clarify the uses of these
sometimes baffling controls.
First, just what is a "trigger"? Remember that there are two different types of scope
sweeps: recurrent and triggered. The recurrent sweep is always present on the CRT face
and can be synchronized by a front-panel control appropriately marked. A triggered sweep
is not recurring and usually is invisible until a trigger pulse comes along to start
the sweep. In normal operation (before triggering), the invisible spot is at the left
side of the CRT. The incoming trigger not only starts the trace, but also triggers an
internal circuit that "unblanks" the beam for the duration of that sweep. Once the sweep
has been initiated, a special "lock-out" circuit keeps any other trigger from affecting
the sweep until that particular sweep is completed and the beam has returned to the left
side of the CRT and is ready to accept another trigger. Therefore, any signal applied
to the trigger circuit (usually from the vertical amplifier) will have no effect during
the sweep time. This is what contributes so much to triggered sweep stability.
The controls for a typical scope triggering section are shown in Fig. 1. Your particular
scope may have different names for these controls, but the principles are the same. Follow
the signal flow shown in Fig. 2.
When the scope is to be used to view a signal, the first step is to estimate the input
signal level and set the vertical amplifier attenuator controls accordingly. Although
a scope, unlike a VOM, cannot normally be damaged by excessive off-scale operation, it
is good practice to make this signal level estimate - keeping in mind that the ac signal
may have a dc component. If the latter is the case, set the vertical amplifier input
selector to AC to begin with. If the scope is left in the DC mode, the desired ac signal
may be riding on enough dc to cause the display to be so far off scale that it can't
be seen. If you know that only an ac signal will be present, then you can use the DC
mode of the vertical input selector.

Fig. 2 - This diagram shows the usual signal flow through triggered
scope.
The first trigger control encountered is the SOURCE selector. If you want to trigger
the sweep at some point on the displayed waveform, use the INT (internal) position. This
automatically picks up the signal from the vertical amplifier. The EXT (external) position
allows the use of a trigger signal from outside the scope. If the displayed signal is
related to the commercial power line frequency, then the LINE position will pick up a
trigger signal from the power supply within the scope.
The next control is the trigger COUPLING selector. If you want to trigger at a particular
dc level on the applied signal, use the DC position. To trigger from an ac signal use
either AC position. If your scope has two AC positions, the one marked AC FAST uses a
network that passes only the higher frequencies and is usually used to block any 60-Hz
component that might be present on the triggering signal.
The SLOPE switch is used to pick a triggering point on either the positive or negative
portion of the triggering waveform. The TRIGGERING LEVEL control is used to pick the
actual point on either the positive- or negative-going portions at which you want the
trigger to occur.
The TRIGGERING MODE switch usually has three positions. In FREE RUN, the sweep oscillator
is made free-running, thus starting another sweep directly after the first is completed.
This is similar to a conventional recurrent sweep scope. If your triggered sweep scope
does not have this position, then the AUTO position may provide this feature, usually
at some low frequency (in many cases, about 50 Hz). The selected trigger signal will
override the 50 Hz to synchronize the sweep properly. In other words, the AUTO mode is
the same as ac coupling, your choice of slope, and the exact center of the triggering
level - provided the applied trigger is faster than 50 Hz. The NORMAL mode is used with
the triggered sweep.
As a further aid to understanding these controls, try this little experiment. Use
a filament transformer as the vertical input source to the scope, As a triggering source,
you can use either the LINE position of the SOURCE switch or you can feed the secondary
of the transformer to the horizontal input also and use the external input as the trigger
source. Use AC coupling and place the SLOPE switch on the positive position. The level
potentiometer can now be adjusted to start the sweep on any portion of the positive-going
sine wave being displayed. Changing the SLOPE switch to the negative position will now
enable you to pick almost any point on the negative half cycle as the starting point.
Posted February 26, 2018
|