|
April 1935 Short Wave Craft
 [Table
of Contents] [Table
of Contents]
Wax nostalgic about and learn from the history of early electronics. See articles
from Short Wave Craft,
published 1930 - 1936. All copyrights hereby acknowledged.
|
Despite all the prefabricated,
relatively inexpensive products available these days, there are still many people
who like to build their own projects. Whether electrical or mechanical - or both
- some sort of enclosure is usually involved. Often, you can cannibalize an existing,
retired project to use its chassis or find a product at Walmart or a home improvement
store that does not cost too much that you can buy just to get its enclosure. Buying
a pre-formed chassis for your project can get expensive, so there are times when
the best option is to obtain a piece of sheet metal (which can also be expensive)
and bend it yourself. If you have never attempted such an endeavor, believe me it
can be pretty challenging, especially with heavier gauge metal. It is usually best
to lay out and drill / cut / punch / file as many holes as possible prior to doing
any bending. This chassis bending article presents a good method for forming your
sheet metal, but does omit recommending making holes prior to bending - maybe hole
cutting was in the next month's edition. If you need a custom box but do not feel
confident making it yourself, try taking your plans to a heating and air conditioning
shop that does its own ductwork fabrication in-house. Those guys are really good
at this stuff, and you will probably get a better price than going to a machine
shop.
How to Bend Your Own Chassis
|
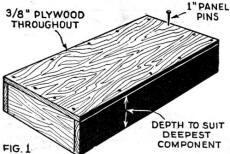
Fig. 1 - Simplest wooden chassis.

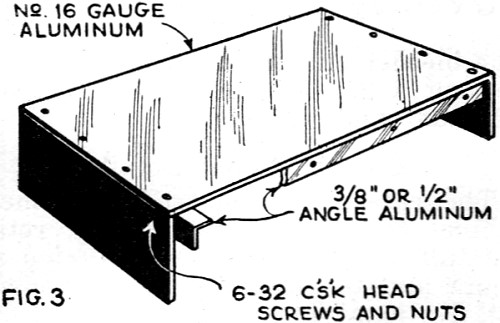
Fig. 3 - Simple design of metal chassis, built up from flat
pieces, without any bending. Angle aluminum or brass, tapped for 6 or 8-32 machine
screws, serve to hold the sections together.
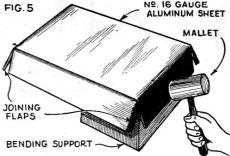
Fig. 5 - The metal, aluminum or steel, is bent by hammering
back and forth along the side to be folded. Don't try to bend it all at once, but
a little at a time along the entire section.
|

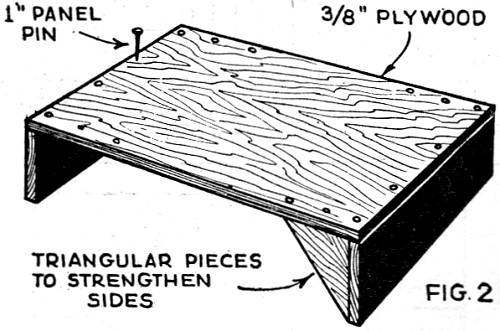
Fig. 2 - More open type of wooden chassis.
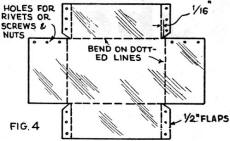
Fig. 4 - Shows how typical metal chassis is laid out before
bending, which takes place along the dotted lines. Flaps are cut out with snips
before bending.

Fig. 6 - Handy way of mounting chassis so it can be rotated
while wiring. Screws permit clamping in any position.
|
To earn the coveted title of Advanced Constructor, you certainly must do something
about set-chassis making. It all depends on how you go about the work. You can with
advantage start off with a really simple wooden chassis, gaining confidence for
more ambitious metal affairs as you construct various shapes and sizes.
Shall we take a look at Fig. 1, for a start? Here is the most straightforward
complete chassis we can imagine. It is made up entirely of wood - preferably treated
wood of the metallized variety. This is available in England, but not here, to our
knowledge. Metal foil or screening could be put over the wood. Tin, zinc or brass
could be used in an emergency.
So that the design in Fig. 1, built up of metallized wood, or metal-covered
wood, is a really sound chassis. Its size depends, of course, on your own needs.
The governing considerations will be the depth - determined by your deepest sub-chassis
mounted component.
You can use 3/8 in. wood for this Fig. 1 chassis, tacking together the top,
sides and ends with 1 inch panel pins (brads). Be generous with these pins, and
then you will have a stout chassis that will stand any amount of knocking about.
If you know that the sub-chassis wiring is going to be rather complicated, or
if there are going to be a lot of components - some being therefore inaccessible
- you might try the Fig. 2 chassis, which is a more skeletonized version.
Tack the top portion to two ends, strengthening up the structure with four triangular
pieces of wood. Use the same wood as before, and the same pins. With a shallow chassis
this method is very satisfactory.
So much for simple wood chassis, which are becoming more popular as amateurs
realize the easy way they can be made up - and as it dawns on amateurs that a good
metallized or metal covered, as explained, wood chassis can do all that a more ornate
all metal job can do.
There are times, though, when a really nice metal chassis is wanted - and then,
assuming you are inexperienced - the Fig. 3 construction is admirable. All
you need are three perfectly flat pieces of No. 16 gauge aluminum, one for the top
and two for the ends. These are then held together by angle brackets, which you
can readily buy quite cheaply - especially in brass. But they are also available
in aluminum if you look long enough.
Now we come to the more complicated sort of chassis - a real all-metal affair.
You can see how it is dimensioned from Fig. 4.
About the bending. This is really quite an art - but an easily acquired one if
you go the right way about it. The first need is a hardwood block to work upon.
It should have true corners - to make sharp bends in the metal when it is hit.
Hit with a wooden or rawhide mallet, too. If an ordinary hammer is used it will
badly mark the metal. You can see how this job is done from Fig. 5.
At Fig. 6 is just a little idea for chassis experiments. Make up a stand,
with two slots in the ends, so that the chassis can be swiveled around - then you
can examine components and get at tricky bits of wiring. -Courtesy English "Amateur
Wireless."
Posted March 2, 2020
(original 1/14/2015)
|