|
<Previous
Next>
Not Such a Smooth Operator
Something happened at work that reminded me of a funny event from way back during
my time at
Westinghouse
Oceanic Division (now part of Northrop Grumman), in Annapolis, MD. There is
a moral to this story.
During my electronics technician days there, I spent the first couple years building
PCBs, wiring harnesses, and system-level assemblies for Navy sonar systems. We had
some really slick stuff like towed vehicles with transducer arrays along the sides,
nose cones for smart torpedoes, flow sensors, proximity fuse elements, etc. The
exposure to all that, and the super-smart people that designed it, fuelled my desire
to go to the trouble of earning an engineering degree.
 One of my tasks for a while was to build
the transducer arrays, which entailed building the hundreds of tiny transducer elements.
The assemblies were made of a machined aluminum base plate (about 1-inch square),
onto which a precisely cut low density foam block was attached. On the top of that
was a set of two machined aluminum plates that sat on either side of a piezoelectric
ceramic transducer element, which was in the center of the foam block. We soldered
silver foil tabs onto the element for later attachment to tiny wire leads that served
as pigtails for connecting to an overall array bus. The final assembly was an acoustic
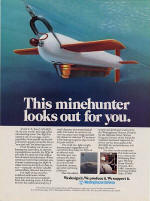
antenna. One mounted on each side of the towed vehicle (the AN/AQS-14, for those
familiar with it). One of my tasks for a while was to build
the transducer arrays, which entailed building the hundreds of tiny transducer elements.
The assemblies were made of a machined aluminum base plate (about 1-inch square),
onto which a precisely cut low density foam block was attached. On the top of that
was a set of two machined aluminum plates that sat on either side of a piezoelectric
ceramic transducer element, which was in the center of the foam block. We soldered
silver foil tabs onto the element for later attachment to tiny wire leads that served
as pigtails for connecting to an overall array bus. The final assembly was an acoustic
antenna. One mounted on each side of the towed vehicle (the AN/AQS-14, for those
familiar with it).
 A CH-53 helicopter
was used to deploy the vehicle, or it could be dragged off the transom of a ship.
Shortly after we began delivering the systems, an F-16 went down off the coast of
San Diego, and one of our first AQS-14s was sent to image the ocean bottom during
the search. It managed to locate the wreckage. The images that we saw were incredible!
You would have sworn that they were optical photographs instead of acoustically
generated images. We could see bolts in the landing gear and panel lines around
the canopy. It was amazing technology for the early 1980s, and I can only imagine
the superiority of modern system. A CH-53 helicopter
was used to deploy the vehicle, or it could be dragged off the transom of a ship.
Shortly after we began delivering the systems, an F-16 went down off the coast of
San Diego, and one of our first AQS-14s was sent to image the ocean bottom during
the search. It managed to locate the wreckage. The images that we saw were incredible!
You would have sworn that they were optical photographs instead of acoustically
generated images. We could see bolts in the landing gear and panel lines around
the canopy. It was amazing technology for the early 1980s, and I can only imagine
the superiority of modern system.
Back to my story, though. During the construction of the transducer modules,
we attached the aluminum bases to a precision fixture that sat on a granite surface
table. It was very smooth and very flat. That table was measured and guaranteed
by our in-house calibration lab (in those days, most defense contractors had complete
in-house capability for repair and calibration of TE) to be flat across its entire
surface with deviations no great than something like ±0.0005 inches (half
a mil). The granite block, measuring about 4 feet by 6 feet and a foot thick, sat
in the middle of the clean room. Although not required to wear the types of "bunny
suits" that you see in photos of semiconductor fab facilities, we were prohibited
from having food or drinks in there. No smoking was allowed, either (in the early
1980s, people were still smoking at their workplaces - yuk!).

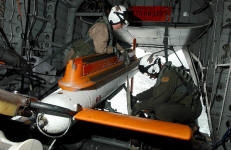
Aviation Electronics Technician 3rd Class Cassie Gibson and Aviation
Structural Mechanic 1st Class Jeffery Osborne secure an AN/AQS-14 mine detection
submersible unit. (U.S. Navy file photo)
There is a good chance that I built the sonar transducer assembly on the
top.
Well, the guy from the Cal Lab that guaranteed the perfection of our surface
table was, to be kind, slightly pompous. He knew he held the power to shut our operation
down and get people in trouble if we were not functioning within the prescribed
guidelines, and enjoyed watching the managers spring into action whenever he "discovered"
a violation. I still remember the glee in his voice when he announced, in an imperious
manner of course, that our mammoth piece of granite had suddenly gone way outside
of the required flatness specification. We had not noticed water running uphill
or any new dimension of space appearing in the confines of our room, so presumably
basic physics of the universe had not changed, so our collective suspicions were
aroused. While we pondered the situation, Measurement Man bolted through the door
to go find a manager. This was a big deal because it meant possibly have to re-measure
all the modules built since the last surface table inspection, and scrapping any
that were out of spec.
A few minutes later, a team of managers returned with our hero to witness the
problem. He re-enacted the measurements in their presence and concluded the same
thing - our table was out of specification. Oh, the on-site Navy QA inspector was
there as well. The place fell silent, and then some fur started flying. Finally,
managers left the area to decide whom to best blame for the situation.
Not believing that this could be so, one of the lead technicians investigated.
Incredibly, he discovered that the culprit was not a faulty surface table, but cookie
crumbs on the bottom of the laser measuring instrument! I kid you not. As it turns
out, the Cal Lab guy had been eating a pack of cookies just before coming into the
clean room to do the measurements, and had not washed his hands before commencing
with the procedure. We routinely washed the surface of the table down with alcohol
and a lintless cloth, so we were sure it was clean prior to his arrival. When confronted
with the situation, he humbly admitted to his sin, and even produced a partially
filled cookie pack from his pocket. From thence forward, he was known affectionately
as the Cookie Monster. Our surface table was re-measured and passed the test. We
were back in business, and the Cookie Monster became a much more humble being, at
least in our presence.
This scenario probably would never prompt Aesop to write a fable with an accompanying
moral to the story, but if he did, the moral might be to never be so full of yourself
that your co-workers long for the day that you slip and take a fall. St. Louis Cardinals'
Dizzy Dean famously said,
"It ain't bragging if you can back it up" in reference to his
plan to pitch well enough to win the World Championship in 1934. Dizzy fulfilled
his promise. Be certain that you can fulfill yours.
Posted December 3, 2020
(updated from original post on 8/18/2009)
|


 "
"