|
<Previous
Next>
Radio Chassis Work Fixture
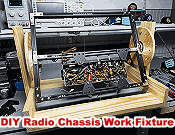
 RF Cafe website visitor and frequent contributor Bob Davis just sent me a photo
of an amazingly nice fixture he made for conveniently holding a radio chassis while
being worked on. When I asked him if I could post it on the website, he prepared
the construction info and additional photos shown below. He even provided links
for purchasing the components! The first inhabitant of Bob's new radio chassis work
fixture was his Zenith Model 6S511 superheterodyne, 6-tube AM broadcast / shortwave
radio. It came out in 1941, which means it was one of the last new radio models
manufactured until the end of World War II (1945), since radio companies were
required to dedicate facilities for the design and assembly of military equipment
during of the war. I wonder if
Mac McGregor had something like this fixture in his Service Shop? RF Cafe website visitor and frequent contributor Bob Davis just sent me a photo
of an amazingly nice fixture he made for conveniently holding a radio chassis while
being worked on. When I asked him if I could post it on the website, he prepared
the construction info and additional photos shown below. He even provided links
for purchasing the components! The first inhabitant of Bob's new radio chassis work
fixture was his Zenith Model 6S511 superheterodyne, 6-tube AM broadcast / shortwave
radio. It came out in 1941, which means it was one of the last new radio models
manufactured until the end of World War II (1945), since radio companies were
required to dedicate facilities for the design and assembly of military equipment
during of the war. I wonder if
Mac McGregor had something like this fixture in his Service Shop?
Bob has used his electronics and mechanical expertise, gained over many decades
as a electrical design engineer, to restore many vintage radios. Some of the ones
featured on RF Cafe include an
RCA 86T radio,
an
Airline 62-437 "Movie Dial" radio, a
Stewart Warner R1451-A radio, a
Philco 46-420 radio, and a
Bendix 75P6U radio.


Zenith Model 6S511 with shielded Wave Magnet antenna.

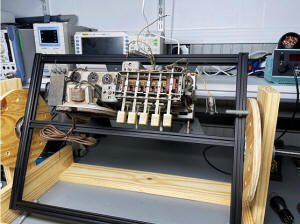
Zenith Model 6S511 chassis in the fixture.
By Bob Davis
Assembly Notes
- I opted to use 3 of the 500 mm T-Slot rails for holding the chassis. One
may use 4, allowing for greater flexibility with centering the chassis on the frame.
- Assembled in two sections. The Frame Assembly and the Stand. You may choose
to make the stand out of stronger material, but the 1x3's I used were in the scrap
pile and the assembly glued together proved to be stable.
- You assemble the Frame to the Stand by loosening the set screws on the flange
bearings and sliding the 12 mm metal rod into them. Tighten the flange bearing
set screws and it holds it all together very well.
- A carriage bolt inserted in the index wheel hole keeps the stand stable and
in the selected position.
- To attach the radio chassis to the stand:
- Loosen the screws attaching the T Plates and the T Shaped Joint Plates to the
2020 extruded rail.
- Align the center rail and T Shaped Joint Plates so they land over the radio
chassis mounting holes.
- Use the radio mounting hardware (from the old radio you're repairing) to attach
the chassis to the T Shaped Joint Plates.
- Square up the T Plates and tighten the bolts which attach them to the T-Slot
rails.
This was a prototype. As the stand matures, I will:
- Add the additional 500 mm T-Slot rail (with sliding T-Nuts) so I can center
the chassis if desired.
- Make the index wheel out of stronger material.
- Add two more mounting holes in the index wheel to attach it to the T-Slot rail.
Parts List
- 500 mm T Slot 2020 Aluminum Extrusion Linear Rail.
Amazon (Buy 4 pieces, see text later.)
- 400 mm T Slot 2020 Aluminum Extrusion Linear Rail.
Amazon
- Steel T Plate Connector For 2020 Series Aluminum Extrusion.
Amazon
- Aluminum Extrusion L Brackets for 2020 Aluminum Linear Rail.
Amazon
- Sliding T Nuts, Metric M5 Thread Slide-In
Amazon
- 2020 Corner Bracket Connectors, 5 Hole, T Shape Joint Plate.
Amazon
- Metal Rod, 12 mm x 100 mm High Speed Steel.
Amazon
- 12mm Zinc Self Aligning Pillow Block Flange Bearing.
Amazon
- Homemade index wheel. Note cut out in center for fit of flange bearing, index
holes drilled at 30 degree increments, and mounting bolts attaching it to 2020 linear
rail with 5 mm bolt and T-Nut.
- (Not Shown) M5 Socket Cap Bolt Assortment (Used for attaching index wheel to
linear rail. I used ½-inch plywood scrap for the index wheel, you may want to use
¾-inch plywood or another material. The bolts in this assortment will allow for
many options.) Amazon
Here is an Amazon Shopping Cart with all
the items for the Radio Chassis Work Fixture added.
All in all, for a weekend project using scrap wood and a few parts from Amazon,
it works very well. I am certain there is room for improvement with the design.
Perhaps it will inspire others to present improved variants.
Zenith Model 6S511
Zenith Model 6S511. Circa 1940. Nice looking Bakelite set. A big issue with these
Zenith chassis aside from the usual capacitor replacements are they used rubber
coated wire for a lot of connections. The rubber insulation turns brittle and falls
off after 80 years. The wire extends into the IF transformers which means a lot
of tedious disassembly/reassembly to replace all the wiring. A lot of folks steer
clear of these 1940's chassis due to this, but I don't mind doing the work.
Here's a link to nice picture of an actual
Zenith Model 6S511
from RadioMuseum.com. This set has a "shielded
Wave Magnet" antenna which uses a nice trick to get rid of some of the E-Field
induced noise on the AM band. I have another Zenith with this antenna and it works
very well. An article on how these work begins on page 15 in this newsletter from
the California Historical Radio Society (get your right hand ready*).
Engineers in the 1940's knew their stuff didn't they?
* A reference to the right-hand rule.
BTW, the workshop seen in the background is a very nice, new, metal building
with spray-on foam insulation to help make keeping the area comfortable in Louisiana
heat and humidity more cost-effective. That foam also does a great job of filtering
out (audible) noise, while the metal building helps filter out RF noise. If you
had a sweeping view of the place, you would see that Bob is a very neat and orderly
guy. All his work is top-notch.
Posted August 6, 2024
|


 "
" RF Cafe website visitor and frequent contributor Bob Davis just sent me a photo
of an amazingly nice fixture he made for conveniently holding a radio chassis while
being worked on. When I asked him if I could post it on the website, he prepared
the construction info and additional photos shown below. He even provided links
for purchasing the components! The first inhabitant of Bob's new radio chassis work
fixture was his Zenith Model 6S511 superheterodyne, 6-tube AM broadcast / shortwave
radio. It came out in 1941, which means it was one of the last new radio models
manufactured until the end of World War II (1945), since radio companies were
required to dedicate facilities for the design and assembly of military equipment
during of the war. I wonder if


