Now that my nearly 4-year-long
grandmother clock project is finally finished, I'm on to the next
big project, which is to restore a 1941
Crosley 03CB
console radio. My intention is to do as complete a restoration as possible (or
reasonable), including repairing and refinishing the wooden cabinet, stripping and
repainting the metal faceplate parts, and completely disassembling and rebuilding
the electronics chassis. By disassembling and rebuilding the electronic chassis
I mean unsoldering and/or unbolting/unriveting every component and then testing
and reinstalling every part. Fortunately, shortly after buying the Crosley radio
($75) from someone who advertised it on Craigslist, a complete electronics chassis
appeared on eBay for $20, so I bought it. Now I have two of everything from which
to make a good working model. Some items like the old paper capacitors will need
to be replaced with modern versions. The vacuum tubes have not yet been tested.
While removing some of the hardware that mounts the electrical chassis to the
wooden cabinet, I discovered some of it was copper plated. So were the 10-32 threaded
studs that held the speaker to the frame. At first I figured I would either just
remove what plating remained with a wire wheel on the grinder, or maybe paint it
a copper color.
 Then, I said to myself, "Self, why not try
re-plating the copper?" After all, I took a couple chemistry courses in college
and remembered electroplating a nickel with copper from a penny. So, I looked up
how to do copper electroplating on the Internet (a resource not available when I
restored my first Crosley 03CB radio back in the 1980s). The preferred method seems
to be using a solution of copper sulfate with a small voltage potential applied
between a copper bar anode (+) and the work piece cathode (-). Electroless plating
could be done with a special commercial solution, but I didn't want to pay the price
(about $40) just to plate some hardware nobody but me would ever notice. Since I
didn't have any copper sulfate on hand I decided the third method would get tried
first. That involved creating my own
Then, I said to myself, "Self, why not try
re-plating the copper?" After all, I took a couple chemistry courses in college
and remembered electroplating a nickel with copper from a penny. So, I looked up
how to do copper electroplating on the Internet (a resource not available when I
restored my first Crosley 03CB radio back in the 1980s). The preferred method seems
to be using a solution of copper sulfate with a small voltage potential applied
between a copper bar anode (+) and the work piece cathode (-). Electroless plating
could be done with a special commercial solution, but I didn't want to pay the price
(about $40) just to plate some hardware nobody but me would ever notice. Since I
didn't have any copper sulfate on hand I decided the third method would get tried
first. That involved creating my own
 dissolved copper solution by using copper
bars for both the anode and the cathode in an acid bath, with an applied voltage
to facilitate a speedy result.
dissolved copper solution by using copper
bars for both the anode and the cathode in an acid bath, with an applied voltage
to facilitate a speedy result.
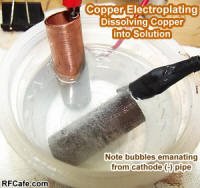
As can be seen in the photo to the left (above), copper did dissolve handily
into the solution after about half an hour at a current of about 100 mA (not
a scientifically determined number - it just seemed right). You can see the bubbles
coming off the cathode copper pipe in the photo to the right. White vinegar was
used for the acid. It started out clear and then turned a characteristic blue-green
over time. I was quite pleased with the result, but the pleasure was short lived.
I removed the copper pipe from the negative lead and clipped it onto on of the 10-32
threaded studs and submersed it in the solution. After about 10 minutes with a current
again at 100 mA the stud exhibited some good copper-colored plating, but it
wiped off  with a rag - bummer. I spent a couple hours
testing other current levels but nothing produced a good robust plating even though
all visible oxidation had been removed from the studs and they were wiped with acetone
prior to dipping. Back to the drawing board.
with a rag - bummer. I spent a couple hours
testing other current levels but nothing produced a good robust plating even though
all visible oxidation had been removed from the studs and they were wiped with acetone
prior to dipping. Back to the drawing board.
After doing a little more research I found that high iron content steel, which
this hardware likely was, did not accept copper plating well without first plating
with something like nickel. It has to to do with the metal's location on the galvanic
chart relative to copper. Not to be deterred, I decided to try the copper sulfate
method. Where to find copper sulfate? It is readily available online from laboratory
supply companies, but the shipping cost would double the total cash outlay. A Google
search revealed that the stuff you dump down your drain or toilet to clear roots
out of underground drain field pipes is loaded with copper sulfate pentahydrate
- close enough. Home Depot sells a 16-ounce bottle for $12. Bingo.
 I dissolved as much of it as I could get
to dissolve in a plastic cup (see photo above left) filled with warm water. It turned
a nice blue color. Another thing I learned on the Internet is that using copper
sulfate was tricky because it would tend to plate the metal without any voltage
applied - immersion plating. I tried that first just for kicks and after about only
10 seconds it produced a really nice copper layer on the stud, but it also wiped
right off. What you need to do is connect the cathode to the part before placing
it in the solution - hot dipping. With a voltage that I knew would produce about
100 mA of current (voltage required varies with distance from the
I dissolved as much of it as I could get
to dissolve in a plastic cup (see photo above left) filled with warm water. It turned
a nice blue color. Another thing I learned on the Internet is that using copper
sulfate was tricky because it would tend to plate the metal without any voltage
applied - immersion plating. I tried that first just for kicks and after about only
10 seconds it produced a really nice copper layer on the stud, but it also wiped
right off. What you need to do is connect the cathode to the part before placing
it in the solution - hot dipping. With a voltage that I knew would produce about
100 mA of current (voltage required varies with distance from the
 anode), I dipped the stud into the solution.
I alternately inserted and removed it every 10 seconds or so until the plating looked
'about right' in scientific terms. I held my breath and wiped the 10-32 stud with
a cloth. Voila! The plating remained! I dipped it a few more times for good measure
and then did the other three. The four 'T' nuts (aka blind nuts) received the same
treatment. It adhered so well that I could use a brass wire brush to shine up the
dull surface finish without burning through anywhere. All eight pieces were dried,
wiped with acetone, and sprayed with a coat of clear acrylic lacquer to preserve
the nice, shiny appearance (see photo to the left).
anode), I dipped the stud into the solution.
I alternately inserted and removed it every 10 seconds or so until the plating looked
'about right' in scientific terms. I held my breath and wiped the 10-32 stud with
a cloth. Voila! The plating remained! I dipped it a few more times for good measure
and then did the other three. The four 'T' nuts (aka blind nuts) received the same
treatment. It adhered so well that I could use a brass wire brush to shine up the
dull surface finish without burning through anywhere. All eight pieces were dried,
wiped with acetone, and sprayed with a coat of clear acrylic lacquer to preserve
the nice, shiny appearance (see photo to the left).
There are a couple other plated brass parts on the electronics chassis that will
eventually get the same treatment. There are shock absorber springs at each corner
of the metal chassis as well as the bolts that pass through the springs and into
the copper 'T' nuts that will need electroplating. Who knows what else I'll decide
to electroplate along the way?
Published August 4, 2013