|
|||||||||||||
 |
|||||||||||||
How to Repair Your Electric Clock
|
|||||||||||||
Great minds think alike, as the old saying goes. Back in 2021, my 1970s-era General Electric Model 7-4305C roll-down number clock-radio began making a high pitch grinding noise. It is powered by a small, pancake AC synchronous motor. After looking on eBay for a replacement motor, I discovered that they were commonly selling for $20-$50, which is more than I paid for the radio. On a whim, I decided to try drilling a small hole in the top of the motor case and injecting a couple drops of 3-in-1 motor oil (there was no way to safely open the case. The motor body was rotated a few times to distribute the oil inside. I did not cover the hole since it was purposely drilled in the top. When I plugged it back in, the noise was gone, and to date has not returned. To my amazement, when perusing my hard copy of the December 1954 issue of Popular Electronics magazine a few days ago, I ran across this "How to Repair Your Electric Clock" article! The author did exactly the same thing I did, except he covered the hole he made. I couldn't believe it. I swear to you I had not seen this method before applying it to my noisy motor. How to Repair Your Electric Clock
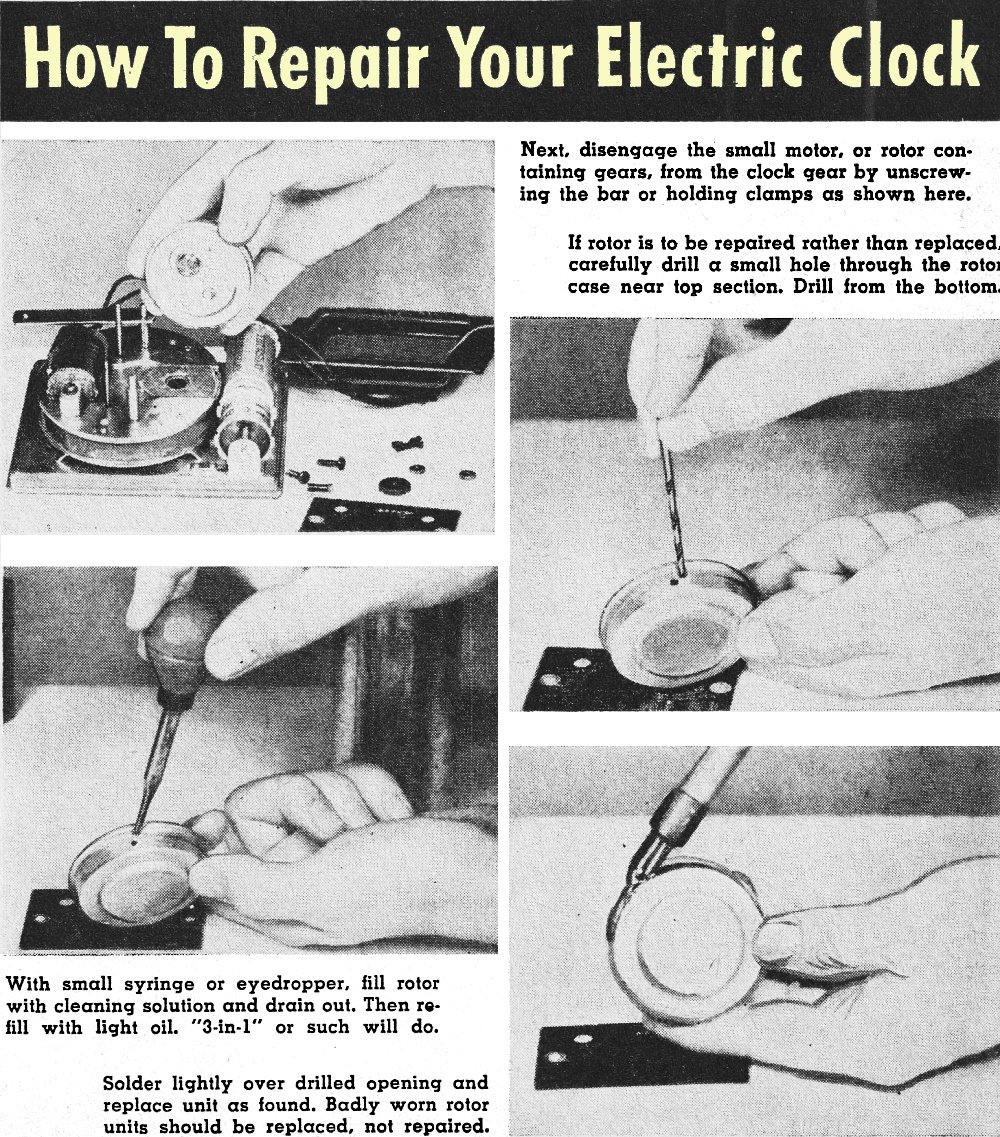
Next, disengage the small motor, or rotor containing gears, from the clock gear by unscrewing the bar or holding clamps as shown here. If rotor is to be repaired rather than replaced, carefully drill a small hole through the rotor case near top section. Drill from the bottom. With small syringe or eyedropper, fill rotor with cleaning solution and drain out. Then refill with light oil. "3-in-1" or such will do. Solder lightly over drilled opening and replace unit as found. Badly worn rotor units should be replaced, not repaired.
Posted October 16, 2023 |
|||||||||||||
 |
|||||||||||||
|
|||||||||||||


|
||||||||||||||||||||||||||||||||||||