|
March 1967 Popular Electronics
 Table of Contents Table of Contents
Wax nostalgic about and learn from the history of early electronics. See articles
from
Popular Electronics,
published October 1954 - April 1985. All copyrights are hereby acknowledged.
|
If you have never seen an old-fashioned
television tuner - particularly a color TV tuner - you have missed a truly impressive
bit of electromechanical ingenuity. I include it here for you to marvel over, not because
you are likely to need the information (although some RF Cafe visitors still use and/or
service such things). Unlike a simple parallel plate capacitor tuner used by many radios,
the TV tuner contains inductors, capacitors, resistors, tubes (or transistors), and many
switch contacts (which provide ample opportunity for intermittent or no electrical contact
when they inevitably get dirty). If a radio is a multi-band job, it nearly always has
a separate switch or switch bank to select a particular band. The band switches place
a different set of inductors and capacitors in a resonating tank circuit along with the
common main capacitor tuner.
Taming Your TV Tuner
By Charles L. Smith
Contact Cleaning is Easy if You Follow These Important Instructions

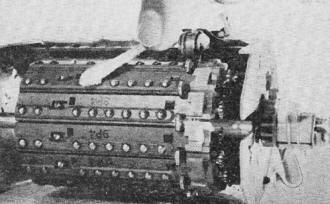
Fig. 1 - Exposed turret tuner contacts are easy to clean. The detent
should work easily and in a positive manner.

Fig. 2 - Touch these coils only at the risk of detuning the channels.
Cleaning the water-switch contacts presents a challenge, but it can be done.

Fig. 3 - Modular-type construction on some sets permits easy access
to the tuner without the need to pull the chassis. In this case, you don't even have
to disconnect any of the leads going to the tuner.

Fig. 4 - To remove the shield, depress the lip with your thumb. It
is possible to get to the tuner on many sets without removing it from the TV chassis.

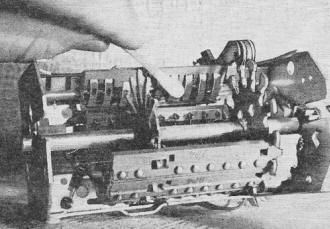
Fig. 5 - Use a cotton swab or a piece of cloth dipped in tuner cleaner
to make the tuner contacts shine. Rotate the drum to expose the hidden channel strips.

Fig. 6 - Depress the channel-strip retainer to release the strip.
Remove about five or six sections to get at the spring contacts. Each one is numbered
in sequence and should be replaced in proper order.

Fig. 7 - Be careful not to distort the setting of the spring contacts.
These contacts can be reset, however, if necessary, by applying a little extra amount
of pressure in the appropriate direction.

Fig. 8 - Smudged channel strips are a sure indication that the spring
contacts are riding on the plastic strips. Raise the contacts to clear the plastic, but
not enough to miss the contacts on the strip.

If you have to jiggle the channel-selector knob on your TV set to bring in a program,
or if the picture and sound conk out again just as the good guys are shooting it out
with the bad guys, it's a good bet that your tuner needs a cleaning. When the many dozens
of silver contacts in a tuner become tarnished and dirty from exposure to the atmosphere,
they make intermittent and poor electrical connections. Connections can become so bad
that the slightest vibration will cause the picture to flash on and off.
Tuner contacts, whether on black-and-white or color TV sets, require frequent cleaning.
How often a cleaning is needed depends upon the environment and to some degree upon the
way the TV set is used. Tuner design and type of contacts also affect the length of time
between cleanings.
Cleaning tuner contacts can be costly. Service shop charges of $5 are not unusual
if the set is brought into the shop. Charges run higher if a serviceman is sent to the
home. Of course, rates vary. Don't put off cleaning the contacts if you have to "shake
well" before using your set, for chances are you are going to jiggle something loose
and do damage.
Types Of Tuners. Disregarding the electrical characteristics, but considering the
mechanical aspects, there are basically two types of tuners in general use that have
a large number of contacts. The turret-type tuner (Fig. 1) takes the prize for the largest
number of contacts. The wafer-switch type (Fig. 2) has more hidden nooks than you can
shake a cleaning cloth at.
The turret tuner has a separate plastic strip for each channel. Each strip has a separate
set of coils which is connected to a set of fixed half-round contacts. The strips are
arranged in a turret-like manner. The turret can be rotated to bring one strip at a time
into position, in line with a set of spring contacts.
Unlike the turret tuner, the wafer-switch tuner has a set of coils connected in series
on each wafer and, depending upon the channel selected, more or fewer coils are switched
into each tuner circuit. The rotary switches "pick up" the correct number of coils for
each channel. For instance, Channel 13 requires only one coil on each wafer, whereas
all the coils are "alive" for Channel 2.
Warning: when you clean the tuner contacts, do not bend, twist, straighten or adjust
any of the coils on the tuner; do not loosen, tighten or adjust any of the screws on
the tuner; do not change the position of any components or leads inside the tuner; do
handle the tuner gently.
Exposing The Tuner. Always a formidable task for a neophyte (and even for a pro so
far as some sets are concerned) is the job of pulling the chassis out of the cabinet
to get at the tuner. If you never pulled a chassis, and if you have any doubts about
your ability to do so, the best advice you can follow is to keep your hands off the set.
You can do a lot of damage. But some sets have tuners that are easy to get to; unitized
construction permits tuner removal for servicing in a matter of minutes. See Fig. 3.
Study the tuner mounting scheme in your particular set to find and remove the retaining
screws. On some sets, only two screws at the back of the set need be taken out to remove
the tuner. Carefully remove the tuner without disturbing the attached wiring. You may
be able to get at the contacts without disconnecting any of the wires which connect the
tuner to the set. If you do remove any of the wires, mark the wires and the terminals
to prevent cross-wiring when reassembling - don't trust your memory. (Do not remove the
tuner if it is mounted on the TV chassis unless you have to. Most chassis-mounted tuners
can be cleaned without removal.)
Remove the U-shaped metal cover by depressing the lock until the projecting lip clears
the tuner chassis as shown in Fig. 4. Dull, discolored contact surfaces showing thin
black streaks reveal a definite need for cleaning.
Cleaning Turret-Type Tuners. Clean away the tarnish by wiping each contact with a
cotton-tipped swab, or other suitable piece of cloth, lightly moistened with a cleaning
solution, as shown in Fig. 5. Rotate the turret to expose all of the strips. Polish the
contacts thoroughly, until all evidence of the cleaner disappears.
When all the rotary contacts are clean, carefully remove about five or six strips
as shown in Fig. 6, and rotate the turret until the spring contacts are accessible, as
shown in Fig. 7. Clean these contacts carefully. Do not exert enough pressure on the
spring contacts to cause them to come to rest at a new angle. These contacts must be
properly positioned. If they are too deeply recessed in their slots, they won't make
contact with the contacts on the channel strips. If the spring contacts project too far
out of their slots, they will ride on the plastic strips and smudge up the strips as
well as the contacts so badly that you'll wonder where the yellow went. (Some plastic
strips are yellow.) See Fig. 8.
You can check the position of these spring contacts by observing their action as you
rotate the turret. The springs should rise and fall as the contacts on the strips pass
the springs. If any of the springs do not rise, gently and judiciously pull them down
just enough to reset them in a lower position. Recheck the action after an adjustment
is made.
It's a good idea to check out the action for all channel strips just in case there
is an out-of-round condition which requires a touch-up adjustment. Of course, you should
also check to see that the springs are not set low enough to touch the plastic strips.
Don't overlook the detent - it centers and holds the turret on the selected channel.
The detent should be free-acting, clean and lubricated. Lubriplate or other similar lubricant
can be used. Do not disassemble the detent if it is in working order.
After you have cleaned the tuner and are satisfied with the mechanical action, you
can "button it up."
Cleaning Wafer-Switch Tuners. Because of their concealed type of construction, wafer-switch
type tuners are more difficult to get into. In a great many cases you can rely on the
wiping action of the contacts to do the elbow work on a cleaning job. Try wiping the
rotary contacts with a pipe-stem cleaner, soaked in a cleaning solution, as you rotate
the tuner shaft. In many cases you have to rely on the rotating contacts to carry the
clean-er around to the inaccessible stationary contacts.
Spray cleaners are handy to get at the "buried" sides of the switches, but you should
avoid spraying anything except the contacts. Some of the sprays can detune your tuner,
especially while they are still wet. If you find a few misplaced channels after an indiscriminate
spraying job, you will have to "dry" out the tuner. Most sprays, particularly the aerosols,
dry out by themselves.
Choosing A Cleaner. Most electronic supply houses stock general-purpose contact cleaners
in 2-oz. bottles that sell for about 50 or 60 cents. If you elect to use such a general-purpose
cleaner, follow up the contact-cleaning operation with a light, filmy application of
silicone lubricant.
There are special-purpose tuner and contact cleaners in various types of packaging,
ranging from eye-dropper bottles to aerosol spray cans; prices range from less than a
dollar to more than three dollars. The aerosol spray cleaner, consisting of carbon tetrachloride,
trichloroethane, or other chlorinated hydrocarbon solvent, washes away foreign matter
under the pressure of freon propellant. Freon, containing no active properties, evaporates
thoroughly.
Most tuner cleaners deposit an extremely thin film of silicone lubricant that guards
against future contamination.
Posted April 2, 2018
|


