October 1954 Popular Electronics
 Table of Contents Table of Contents
Wax nostalgic about and learn from the history of early electronics. See articles
from
Popular Electronics,
published October 1954 - April 1985. All copyrights are hereby acknowledged.
|
Every hobby magazine worth
the paper its printed on has a "tricks of the trade" type column. Popular Electronics
started out its very first issue in October 1954 with a column that went by exactly
that name. It contained a very extensive assortment of tips and tricks (aka
"kinks"). The images are rather small, but you can get what the inventor had in
mind. It's good stuff to know, even in 67 years later in 2022 because just about
everything here is applicable in today's electronic projects.
Tricks of the Trade
Removing Braid from Shielded Cable
 Shielded cable, whether used in audio or
r.f. work, always presents a problem to the experimenter as stripping and removing
parts of the braid are not easy. A good technique is as follows: If an outer layer
of insulation is used, remove a portion by running a sharp knife around the cable,
flexing it slightly to break the insulation loose as shown in (A). Too much pressure
on the knife may nick the braid. Loosen the braid with the fingers and push it back
so that a flat ring is formed as shown in (B). Using diagonal cutters, clip the
outer edges of the flat ring (C) thus separating the braid. Remove the excess braid
and strip a portion of the insulation from the inner conductor as shown in (D).
. . . . . . . L.G. Shielded cable, whether used in audio or
r.f. work, always presents a problem to the experimenter as stripping and removing
parts of the braid are not easy. A good technique is as follows: If an outer layer
of insulation is used, remove a portion by running a sharp knife around the cable,
flexing it slightly to break the insulation loose as shown in (A). Too much pressure
on the knife may nick the braid. Loosen the braid with the fingers and push it back
so that a flat ring is formed as shown in (B). Using diagonal cutters, clip the
outer edges of the flat ring (C) thus separating the braid. Remove the excess braid
and strip a portion of the insulation from the inner conductor as shown in (D).
. . . . . . . L.G.
Straightening Bus Bar
Bare, tinned copper wire or "bus bar" is often used in commercially-built test
equipment. Unfortunately, this bus bar develops kinks and wrinkles if left around
the workshop bench and should be straightened before being used in home wiring projects.
To straighten any sized bus bar, from 22 gauge to 12 gauge, clamp one end in a heavy
bench vise and grasp the other end tightly with a pair of pliers. Now apply a strong,
steady pull on the wire. Use plenty of strength, but don't pull too hard or jerk
the wire as it may break. The wire will straighten out nicely and may even stretch
slightly. If this happens, the wire diameter will be reduced and the wire will tend
to be stiffer and hold its shape better.
Terminating Shielded Cables
 Small diameter shielded cables, such as
microphone cable, as well as small sizes of r.f. coaxial cable, may be terminated
in a professional way by using the method shown in the diagram. If the cable has
an outer insulator, remove about 3" of this material as shown in (A) thus exposing
the braid. Next, push the braid back to loosen it and bend the cable slightly. With
a soldering aid, a scribe, or a small nail start working the strands of the braid
apart to form a small hole as shown in (B). Keep working on the opening and bending
the cable until you can get the tool under the inner conductor (C). Now slip your
tool under the inner conductor and pull the free end out of the braid (D). Hold
the edges of the braid back with the fingernail, if necessary, while performing
the operation. With the inner conductor free of the braid, stretch the braid out
until the opening is closed tightly around the inner conductor (E). Finally, finish
the job by stripping insulation from the inner conductor and flatten the extra length
of braid to form a ground strap as shown in (F). . . . . . . .
L.G. Small diameter shielded cables, such as
microphone cable, as well as small sizes of r.f. coaxial cable, may be terminated
in a professional way by using the method shown in the diagram. If the cable has
an outer insulator, remove about 3" of this material as shown in (A) thus exposing
the braid. Next, push the braid back to loosen it and bend the cable slightly. With
a soldering aid, a scribe, or a small nail start working the strands of the braid
apart to form a small hole as shown in (B). Keep working on the opening and bending
the cable until you can get the tool under the inner conductor (C). Now slip your
tool under the inner conductor and pull the free end out of the braid (D). Hold
the edges of the braid back with the fingernail, if necessary, while performing
the operation. With the inner conductor free of the braid, stretch the braid out
until the opening is closed tightly around the inner conductor (E). Finally, finish
the job by stripping insulation from the inner conductor and flatten the extra length
of braid to form a ground strap as shown in (F). . . . . . . .
L.G.
Self-Tapping Screw
 A Self-Tapping screw, suitable for use in
aluminum, as well as Bakelite, Lucite, polystyrene, and other plastics, may be made
in a few minutes from a conventional machine screw. A Self-Tapping screw, suitable for use in
aluminum, as well as Bakelite, Lucite, polystyrene, and other plastics, may be made
in a few minutes from a conventional machine screw.
Using a steel machine screw of the desired size and length, run a nut up on the
screw, almost to the head, as shown in (A). Next clamp the screw and nut in a vise
and taper the end (B) using a flat file. Then, using a triangular file, file three
or four tapered notches along the screw. The notches should run the length of the
screw as shown in (C) and be deepest at the end farthest from the head. Finally,
remove the nut, as shown in (D), thus restoring any damaged threads.
. . . . . . . L.G.
Shortening Screws
Too-Long machine screws may be shortened by following a few simple steps. First
select a steel nut to fit the screw, then run it up on the screw past the part to
be cut off. Clamp the screw and nut in a vise, cut off the unwanted portion, using
either bolt cutters or a hack saw. Remove sharp burrs with a few passes of the file
and then remove the nut. As the nut is run off the screw, the damaged threads will
be restored. . . . . . . . L.G.
Foil Shielding
Aluminum foil is a handy accessory to have in the home workshop for trouble-
shooting chirps and whistles in superhets due to insufficient shielding. Every "new-born"
home-constructed superhet receiver seems to have at least a couple of these hard-to-clean-up
bugs. Place the set on a sheet of foil and fold up the ends to determine whether
shielding the entire chassis will help. Form the foil into temporary tube and coil
shields and put barriers of the foil between any components suspected of feedback.
This is much faster than the usual procedure of setting up permanent shields and
then removing them when they don't seem to help. When components feeding back are
found, isolate them entirely with conventional shielding. Always be sure to ground
all shields-permanent or temporary. . . . . . . . D. McM.
Miniature Shields
Recently I found it necessary to shield a small superheterodyne oscillator coil.
Since none small enough for the purpose was on hand, I used the zinc can from a
flashlight cell. Simply cut the can with a hacksaw close to the positive end of
the cell, grasp the cloth lining with pliers, tear out, and clean the inside of
the can. Cut holes for the leads and lugs for screw fastening. Penlight cells make
good subminiature shields for portable radios. . . . . . . . D.
McM.
Small Storage "Bins"
 Small metal boxes, of the type used for certain
types of sliced pipe tobacco, for expensive cigarettes, and for cough lozenges,
make excellent containers for small screws, nuts, soldering lugs, mica and ceramic
capacitors, and small carbon resistors. The boxes are quite sturdy. Labels may be
attached quite easily either by using Scotch tape or by cementing the paper label
directly to the metal. Use Duco cement or its equivalent. If the boxes are to be
stacked on a shelf, labels should be placed on the edge of the box as well as on
the top. Small metal boxes, of the type used for certain
types of sliced pipe tobacco, for expensive cigarettes, and for cough lozenges,
make excellent containers for small screws, nuts, soldering lugs, mica and ceramic
capacitors, and small carbon resistors. The boxes are quite sturdy. Labels may be
attached quite easily either by using Scotch tape or by cementing the paper label
directly to the metal. Use Duco cement or its equivalent. If the boxes are to be
stacked on a shelf, labels should be placed on the edge of the box as well as on
the top.
Low Cost Coil Forms
 Small plastic vials or "pill boxes" make U excellent low cost experimental coil
forms. Small holes may be drilled in the side of the box for fastening the coil
wire. Two holes are used at each end of the winding and the wire looped through
them. The completed coil may be fastened in a vertical position by using a single
screw through the bottom of the vial. If horizontal mounting is preferred, a single
"L" bracket may be used. Where an easily removable coil is de- sired, the cap may
be used for mounting, as shown in the photograph. The mounting bracket and cap are
left permanently mounted on the chassis and different coils may be quickly slipped
into place. Small plastic vials or "pill boxes" make U excellent low cost experimental coil
forms. Small holes may be drilled in the side of the box for fastening the coil
wire. Two holes are used at each end of the winding and the wire looped through
them. The completed coil may be fastened in a vertical position by using a single
screw through the bottom of the vial. If horizontal mounting is preferred, a single
"L" bracket may be used. Where an easily removable coil is de- sired, the cap may
be used for mounting, as shown in the photograph. The mounting bracket and cap are
left permanently mounted on the chassis and different coils may be quickly slipped
into place.
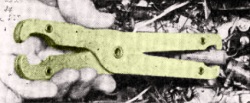
Improving Diagonal Pliers
 Conventional diagonal cutting pliers, as supplied
by Klein or Peck-Stow are suitable for most purposes. When it comes to fine cable
work, or snipping extensive runs of lacing in a remodeling job, the cutter noses
often prove to be too bulky. A few minutes at the power grinder will correct this
situation. Grind off excess jaw material as shown in the photograph (top), dousing
frequently in water to prevent loss of temper. While the modified tool should not
be used for cutting No. 9 steel wire, it is a natural for fine cable work.
. . . . . . . F.R. Conventional diagonal cutting pliers, as supplied
by Klein or Peck-Stow are suitable for most purposes. When it comes to fine cable
work, or snipping extensive runs of lacing in a remodeling job, the cutter noses
often prove to be too bulky. A few minutes at the power grinder will correct this
situation. Grind off excess jaw material as shown in the photograph (top), dousing
frequently in water to prevent loss of temper. While the modified tool should not
be used for cutting No. 9 steel wire, it is a natural for fine cable work.
. . . . . . . F.R.
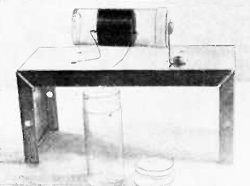
Wiring Small Chassis
 One tube circuits, such as code practice oscillators, preamplifiers, and similar
items are generally wired on very small chassis bases. Such chassis are quite difficult
to handle and have a bad habit of sliding across the work bench at the wrong time.
A standard drill press vise, available at most hardware stores, makes an excellent
mounting base to hold a subminiature chassis during wiring. Clamp the chassis by
its edges, as shown in the photograph. Tighten the vise sufficiently to get a good
grip on the chassis but do not use too much pressure lest you bend or distort the
chassis. The drill press vise has a number of other uses around the shop. It may
be used for holding small brackets when drilling, to hold a coil form while winding
a coil, to clamp a small loudspeaker in an upright position for temporary use, and
in other applications. One tube circuits, such as code practice oscillators, preamplifiers, and similar
items are generally wired on very small chassis bases. Such chassis are quite difficult
to handle and have a bad habit of sliding across the work bench at the wrong time.
A standard drill press vise, available at most hardware stores, makes an excellent
mounting base to hold a subminiature chassis during wiring. Clamp the chassis by
its edges, as shown in the photograph. Tighten the vise sufficiently to get a good
grip on the chassis but do not use too much pressure lest you bend or distort the
chassis. The drill press vise has a number of other uses around the shop. It may
be used for holding small brackets when drilling, to hold a coil form while winding
a coil, to clamp a small loudspeaker in an upright position for temporary use, and
in other applications.
Making "L" Brackets
 The experimenter and home builder frequently
needs "L" brackets for mounting shield plates, trimmer capacitors, and similar components.
These may be made easily by cutting them from a piece of aluminum angle, available
in the "do-it-yourself" section of most hardware stores. Clamp the angle bar in
a vise, as shown in the photograph, and cut off brackets of the desired size with
an ordinary hacksaw. Rough edges are then smoothed with a file or a pocket knife.
If screw holes are needed in the final bracket, drill these before cutting it off
the angle bar. The experimenter and home builder frequently
needs "L" brackets for mounting shield plates, trimmer capacitors, and similar components.
These may be made easily by cutting them from a piece of aluminum angle, available
in the "do-it-yourself" section of most hardware stores. Clamp the angle bar in
a vise, as shown in the photograph, and cut off brackets of the desired size with
an ordinary hacksaw. Rough edges are then smoothed with a file or a pocket knife.
If screw holes are needed in the final bracket, drill these before cutting it off
the angle bar.
Test Prod Aid
 I find that an ordinary phone-tip-jack comes
in handy for holding a test-prod to a wire or lug. Simply push the tip of the prod
into the tip-jack, and then clamp the dual lugs of the jack onto the wire, as shown
in the photo. If desired, you can remove the nut from the tip-jack and wrap a couple
of turns of tape around the threaded shank of the jack, this helps to prevent shorts
when working in crowded places. I find that an ordinary phone-tip-jack comes
in handy for holding a test-prod to a wire or lug. Simply push the tip of the prod
into the tip-jack, and then clamp the dual lugs of the jack onto the wire, as shown
in the photo. If desired, you can remove the nut from the tip-jack and wrap a couple
of turns of tape around the threaded shank of the jack, this helps to prevent shorts
when working in crowded places.
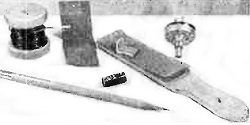
Repairing Coil Studs
 Many of the small coils used in radio and electronics
work have powdered iron brass stud having a narrow screwdriver slot. This slot so
weakens the stud that frequent breakage occurs during adjustment, especially when
the stud is tight or when too large a screwdriver is used for adjustment. A typical
broken stud is shown on the coil to the left in the photograph. An effective and
permanent repair maybe made by soldering a small nut on the end of the stud. Select
a hex nut of the right size and having the proper number of threads. Spread a thin
film of rosin base soldering flux on the tip of the stud, then screw on the nut
until flush with the end of the stud. Hold a hot soldering iron against the nut,
being careful not to touch its edges, and flow a small amount of solder into the
joint. A coil prepared using this technique is shown to the right in the photograph.
After the repair is completed, a hollow "hex" type alignment tool is used for adjusting
the coil. Many of the small coils used in radio and electronics
work have powdered iron brass stud having a narrow screwdriver slot. This slot so
weakens the stud that frequent breakage occurs during adjustment, especially when
the stud is tight or when too large a screwdriver is used for adjustment. A typical
broken stud is shown on the coil to the left in the photograph. An effective and
permanent repair maybe made by soldering a small nut on the end of the stud. Select
a hex nut of the right size and having the proper number of threads. Spread a thin
film of rosin base soldering flux on the tip of the stud, then screw on the nut
until flush with the end of the stud. Hold a hot soldering iron against the nut,
being careful not to touch its edges, and flow a small amount of solder into the
joint. A coil prepared using this technique is shown to the right in the photograph.
After the repair is completed, a hollow "hex" type alignment tool is used for adjusting
the coil.
Test Lead Rack
 If you find that your clip and test leads are
constantly getting tangled, make a small rack to hold them. Here's one you can make
in a few minutes' time at almost zero cost. Drive 8 penny (or larger) finishing
nails into a piece of 1 x 3 or 1 x 2 board. For leads having clips, space the nails
about one to two inches apart. For leads without clips (phone tips or banana plugs)
use two nails at each position, spaced slightly greater than the diameter of the
test lead wire and drive them in at a slight angle. If you find that your clip and test leads are
constantly getting tangled, make a small rack to hold them. Here's one you can make
in a few minutes' time at almost zero cost. Drive 8 penny (or larger) finishing
nails into a piece of 1 x 3 or 1 x 2 board. For leads having clips, space the nails
about one to two inches apart. For leads without clips (phone tips or banana plugs)
use two nails at each position, spaced slightly greater than the diameter of the
test lead wire and drive them in at a slight angle.
Soldering Small Parts
 When you have to solder a screw, bracket, or
other small part, don't clamp it in a vise. You'll find that the heavy metal of
the vise conducts the heat away too rapidly for you to do a good job. Instead, cut
a small hole in a cardboard box large enough to hold the part. Next, use the box
as a support while soldering. Cardboard is a poor conductor of heat and will serve
to insulate the part while you do the job. If the box chars slightly, don't worry-they
are cheap. Since cardboard tends to char rather than to burn actively there is little
danger of setting your workshop alight with this idea if you don't use the box as
a soldering iron rest instead of your regular metal one. When you have to solder a screw, bracket, or
other small part, don't clamp it in a vise. You'll find that the heavy metal of
the vise conducts the heat away too rapidly for you to do a good job. Instead, cut
a small hole in a cardboard box large enough to hold the part. Next, use the box
as a support while soldering. Cardboard is a poor conductor of heat and will serve
to insulate the part while you do the job. If the box chars slightly, don't worry-they
are cheap. Since cardboard tends to char rather than to burn actively there is little
danger of setting your workshop alight with this idea if you don't use the box as
a soldering iron rest instead of your regular metal one.
Sandpaper Pad
 You'll find that those small sandpaper pads
artists and draftsmen use to sharpen their pencils are pretty handy to have around
the home lab. In addition to keeping your pencils pointed, you can use them in place
of a fine file for smoothing brackets and other small parts, and for removing the
"burrs" from volume controls and switch shafts. Use them for smoothing Bakelite
and plastic parts, too. A clogged file is hard to clean, but the small strip of
sandpaper is cheap enough to discard. You will also find that the sandpaper is just
right for removing the enamel from magnet and coil wire. You'll find that those small sandpaper pads
artists and draftsmen use to sharpen their pencils are pretty handy to have around
the home lab. In addition to keeping your pencils pointed, you can use them in place
of a fine file for smoothing brackets and other small parts, and for removing the
"burrs" from volume controls and switch shafts. Use them for smoothing Bakelite
and plastic parts, too. A clogged file is hard to clean, but the small strip of
sandpaper is cheap enough to discard. You will also find that the sandpaper is just
right for removing the enamel from magnet and coil wire.
"Spinner Knobs" for Radios
 Here is an easy way to make a spinner knob out
of almost any tuning knob. Probably you can use the tuning knob you have on your
broadcast or communications set now. This trick comes in handy when you want to
make a quick change from a station on the low-frequency end of the dial to a station
on the high-frequency end of the dial, or vice versa. Using a #46 drill, drill a
hole into one side of the tuning knob and drive a length of #12 bare copper wire
into the hole. Cut the wire off so about 3/4" projects from the knob and file the
end smooth and round so it cannot injure the fingers. The photograph at left below
shows the completed knob. In use simply place the forefinger along one side of the
wire stem and spin the knob. The stem acts as a lever and keeps the finger from
slipping off the knob. If desired, use a longer piece of wire and make a right-angle
bend near the end to form a crank. If the wire stem fits the hole in the knob too
loosely, use a little Duco cement. Here is an easy way to make a spinner knob out
of almost any tuning knob. Probably you can use the tuning knob you have on your
broadcast or communications set now. This trick comes in handy when you want to
make a quick change from a station on the low-frequency end of the dial to a station
on the high-frequency end of the dial, or vice versa. Using a #46 drill, drill a
hole into one side of the tuning knob and drive a length of #12 bare copper wire
into the hole. Cut the wire off so about 3/4" projects from the knob and file the
end smooth and round so it cannot injure the fingers. The photograph at left below
shows the completed knob. In use simply place the forefinger along one side of the
wire stem and spin the knob. The stem acts as a lever and keeps the finger from
slipping off the knob. If desired, use a longer piece of wire and make a right-angle
bend near the end to form a crank. If the wire stem fits the hole in the knob too
loosely, use a little Duco cement.
Amplifier Connectors
 When experimenting with audio amplifiers, preamplifiers,
modulators, etc., it is often desired to make quick temporary connections from other
equipment to "ground" or chassis of the amplifier. I find it handy to use the cable-protecting-spring
in the female mike cable connector, as shown in the photo. Simply bend the spring
a little and slip the wires in between the coils of the spring, or push the wires
in with a fingernail. The spring holds the wires securely and the wires can be quickly
removed when desired. When experimenting with audio amplifiers, preamplifiers,
modulators, etc., it is often desired to make quick temporary connections from other
equipment to "ground" or chassis of the amplifier. I find it handy to use the cable-protecting-spring
in the female mike cable connector, as shown in the photo. Simply bend the spring
a little and slip the wires in between the coils of the spring, or push the wires
in with a fingernail. The spring holds the wires securely and the wires can be quickly
removed when desired.
Intermittent Checker
 Laminated fiber fuse pullers of the type used
by electricians are convenient in "wiggling" or moving radio or TV capacitors or
resistors which fail intermittently. Such fuse pullers are available at electrical
supply stores in over-all lengths from 5 to 7½ inches with jaws at both ends
which fit cartridge fuses. The fiber handles are insulated and with care permit
grasping a capacitor or resistor and moving it slightly, while set is operating,
to note results. Laminated fiber fuse pullers of the type used
by electricians are convenient in "wiggling" or moving radio or TV capacitors or
resistors which fail intermittently. Such fuse pullers are available at electrical
supply stores in over-all lengths from 5 to 7½ inches with jaws at both ends
which fit cartridge fuses. The fiber handles are insulated and with care permit
grasping a capacitor or resistor and moving it slightly, while set is operating,
to note results.
Posted October 28, 2022
(updated from original post
on 9/9/2011
|