|
August 1969 Radio-Electronics
 [Table of Contents] [Table of Contents]
Wax nostalgic about and learn from the history of early electronics.
See articles from Radio-Electronics,
published 1930-1988. All copyrights hereby acknowledged.
|
When I saw this article on "Repairing Ferrite Rods," it caught my interest because
I remember breaking one in a transistor radio not from dropping it, which might
have been excusable, but from screwing around with it. It probably wasn't too far
removed in time from when the article appeared in Radio-Electronics magazine,
although I was not reading such publications at the time (I was 11 years old). I
don't recall exactly how I snapped it, but it broke under the windings and I was
sure I had ruined it. Fortunately, it still worked just fine, even without making
any attempt to glue it back together. A ready stock of Duco Cement was always on-hand
from my model airplane and rocket building hobby, but given that the break was under
the windings and not readily accessible, there was good chance more damage would
be done trying to squeeze glue into it. I don't recall whether the pointer position
on the dial was still lined up with where the radio station used to be, but all
that mattered was escaping what could have been a disaster for me. In those days,
money for a new radio was not just laying around.
Repairing Ferrite Rods
 One common casualty in a dropped transistor
portable is the brittle ferrite core of the antenna. Replacement can be a serious
problem. If you're stuck, you can rejoin the broken pieces with almost any good
adhesive. Performance is not noticeably affected. One common casualty in a dropped transistor
portable is the brittle ferrite core of the antenna. Replacement can be a serious
problem. If you're stuck, you can rejoin the broken pieces with almost any good
adhesive. Performance is not noticeably affected.
Best for the job are the epoxy-resin cements, but ordinary acetate service cement
will do. Even "white glue" (like Elmer's) has been used successfully.
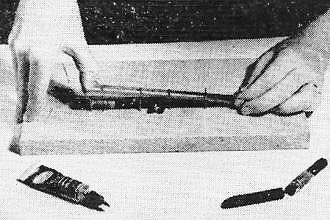
About the only way to apply pressure along the rod to keep the two pieces together
while the glue dries, and at the same time apply lateral force to keep the joint
from buckling, is to whip up a little jig like that in the photos. Drive small brads
into a scrap of board - two rows, spaced the width (or diameter) of the ferrite
rod, and each nail spaced about an inch. Leave room on the board for another set
of brads, to accommodate a core size that won't fit the first.
Bring the two glue-coated ends together and lay the rod between the rows of brads.
Now stretch a sturdy rubber band around the rod and nails. Lay the whole thing aside
out of the way to dry.
For high curing temperatures, you will have to fabricate a jig out of metal.
Follow the glue manufacturer's directions about setting and curing time and temperatures.
When the repair is dry, smooth off bits of dried cement with a file and sandpaper.
Be careful not to stress the joint too much, or it may come apart again.
Hollow ferrite cores usually have too little surface exposed to make a strong
glued joint. To repair those, shape a plastic or wooden dowel to fit the hollow
core. Coat it with glue; it will act as a splint and strengthen the joint tremendously.
Don't use a metal rod.
Much of this material comes from Werkstatt Praxis, a service publication of Siemens-Electrogerate
AG, Berlin and Munich - Peter E. Sutheim.
Posted August 25, 2023
|


