Module 11 - Microwave Principles Pages
i,
1-1, 1-11,
1-21,
1-31,
1-41,
1-51,
1-61,
2-1,
2-11, 2-21,
2-31,
2-41,
2-51,
2-61,
3-1,
3-11,
AI-1,
Index-1,
Assignment 1,
Assignment 2
...Pages 1-31 through 1-40
electrolytic corrosion is not taking place. Any waveguide that is exposed to
the weather should be painted and all joints sealed. Proper painting prevents natural
corrosion, and sealing the joints prevents moisture from entering the waveguide.
Moisture can be one of the worst enemies of a waveguide system. As previously
discussed, the dielectric in waveguides is air, which is an excellent dielectric
as long as it is free of moisture. Wet air, however, is a very poor dielectric and
can cause serious internal arcing in a waveguide system. For this reason care is
taken to ensure that waveguide systems are pressurized with air that is dry. Checking
the pressure and moisture content of the waveguide air may be one of your daily
system maintenance duties.
Figure 1-53 - Directional coupler - RF Cafe
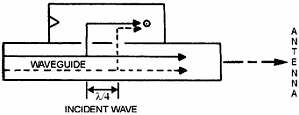
Figure 1-54 - Incident wave in a directional coupler designed
to sample incident waves.
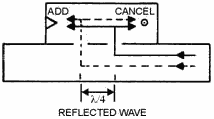
Figure 1-55 - Reflected wave in a directional coupler.
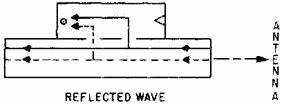
Figure 1-56 - Directional coupler designed to sample reflected
energy.
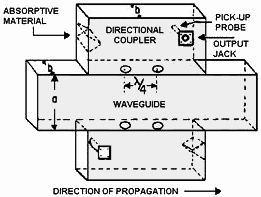
Figure 1-57 - Bidirectional coupler.
More detailed waveguide installation and maintenance information can be found
in the technical manuals that apply to your particular system. Another good source
is the Electronics Installation and Maintenance Handbooks (EIMB) published by Naval
Sea Systems Command. Installation Standards Handbook EIMB, NAVSEA 0967-LP-000-0110,
is the volume that deals with waveguide installation and maintenance.
Q-41. What is the result of an abrupt change in the size, shape, or dielectric
of a waveguide?
Q-42. a waveguide bend must have what minimum radius?
Q-43. What is the most common type of waveguide joint?
Q-44. What is the most likely cause of losses in waveguide systems?
Waveguide Devices
The discussion of waveguides, up to this point, has been concerned only with
the transfer of energy from one point to another. Many waveguide devices have been
developed, however, that modify the energy in some fashion during transit. Some
devices do nothing more than change the direction of the energy. Others have been
designed to change the basic characteristics or power level of the electromagnetic
energy.
This section will explain the basic operating principles of some of the more
common waveguide devices, such as DirectIONAL COUPLERS, CAVITY RESONATORS, and HYBRID
JUNCTIONS.
Directional Couplers
The directional coupler is a device that provides a method of sampling energy
from within a waveguide for measurement or use in another circuit. Most couplers
sample energy traveling in one direction only. However, directional couplers can
be constructed that sample energy in both directions. These are called BIDirectIONAL
couplers and are widely used in radar and communications systems.
Directional couplers may be constructed in many ways. The coupler illustrated
in figure 1-53 is constructed from an enclosed waveguide section of the same dimensions
as the waveguide in which the energy is to be sampled. The "b" wall of this enclosed
section is mounted to the "b" wall of the waveguide from which the sample will be
taken. There are two holes in the "b" wall between the sections of the coupler.
These two holes are 1/4λ apart. The upper section of the directional coupler has
a wedge of energy-absorbing material at one end and a pickup probe connected to
an output jack at the other end. The absorbent material absorbs the energy not directed
at the probe and a portion of the overall energy that enters the section.
Figure 1-54 illustrates two portions of the incident wavefront in a waveguide.
The waves travel down the waveguide in the direction indicated and enter the coupler
section through both holes. Since both portions of the wave travel the same distance,
they are in phase when they arrive at the pickup probe. Because the waves are in
phase, they add together and provide a sample of the energy traveling down the waveguide.
The sample taken is only a small portion of the energy that is traveling down the
waveguide. The magnitude of the sample, however, is proportional to the magnitude
of the energy in the waveguide. The absorbent material is designed to ensure that
the ratio between the sample energy and the energy in the waveguide is constant.
Otherwise the sample would contain no useful information.
The ratio is usually stamped on the coupler in the form of an attenuation factor.
The effect of a directional coupler on any reflected energy is illustrated in
figure 1-55. Note that these two waves do not travel the same distance to the pickup
probe. The wave represented by the dotted line travels 1/2λ further and arrives
at the probe 180 degrees out of phase with the wave represented by the solid line.
Because the waves are 180 degrees out of phase at the probe, they cancel each other
and no energy is induced in the pickup probe. When the reflected energy arrives
at the absorbent material, it adds and is absorbed by the material.
A directional coupler designed to sample reflected energy is shown in figure
1-56. The absorbent material and the probe are in opposite positions from the directional
coupler designed to sample the incident energy. This positioning causes the two
portions of the reflected energy to arrive at the probe in phase, providing a sample
of the reflected energy. The sampled transmitted energy, however, is absorbed by
the absorbent material.
A simple bidirectional coupler for sampling both transmitted and reflected energy
can be constructed by mounting two directional couplers on opposite sides of a waveguide,
as shown in figure 1-57.
Q-45. What is the primary purpose of a directional coupler?
Q-46. How far apart are the two holes in a simple directional coupler?
Q-47. What is the purpose of the absorbent material in a directional coupler?
Q-48. In a directional coupler that is designed to sample the incident energy,
what happens to the two portions of the wavefront when they arrive at the pickup
probe?
Q-49. What happens to reflected energy that enters a directional coupler that
is designed to sample incident energy?
Cavity Resonators
In ordinary electronic equipment a resonant circuit consists of a coil and a
capacitor that are connected either in series or in parallel. The resonant frequency
of the circuit is increased by reducing the capacitance, the inductance, or both.
A point is eventually reached where the inductance and the capacitance can be reduced
no further. This is the highest frequency at which a conventional circuit can oscillate.
The upper limit for a conventional resonant circuit is between 2000 and 3000
megahertz. At these frequencies, the inductance may consist of a coil of one-half
turn, and the capacitance may simply be the stray capacitance of the coil. Tuning
a one-half turn coil is very difficult and tuning stray capacitance is even more
difficult. In addition, such a circuit will handle only very small amounts of current.
NEETS, Module 10, Introduction to Wave Propagation explained that a 1/4λ section
of transmission line can act as a resonant circuit. The same is true of a 1/4λ section
of waveguide. Since a waveguide is hollow, it can also be considered as a RESONANT
CAVITY.
By definition, a resonant cavity is any space completely enclosed by conducting
walls that can contain oscillating electromagnetic fields and possess resonant properties.
The cavity has many advantages and uses at microwave frequencies. Resonant cavities
have a very high Q and can be built to handle relatively large amounts of power.
Cavities with a Q value in excess of 30,000 are not uncommon. The high Q gives these
devices a narrow bandpass and allows very accurate tuning. Simple, rugged construction
is an additional advantage.
Although cavity resonators, built for different frequency ranges and applications,
have a variety of shapes, the basic principles of operation are the same for all.
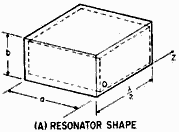
Figure 1-58A - Rectangular waveguide cavity resonator.
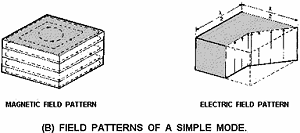
Figure 1-58B - Rectangular waveguide cavity resonator.
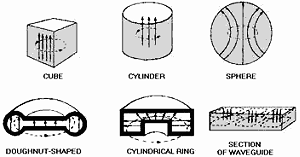
Figure 1-60 - Several types of cavities.
One example of a cavity resonator is the rectangular box shown in figure 1-58A.
It may be thought of as a section of rectangular waveguide closed at both ends by
conducting plates. The frequency at which the resonant mode occurs is 1/2λ of the
distance between the end plates. The magnetic and electric field patterns in the
rectangular cavity are shown in figure 1-58B.
Field Patterns of a Simple Mode
The rectangular cavity is only one of many cavity devices that are useful as
high-frequency resonators. Figures 1-59A, 1-59B, 1-59C, and 1-59D show the development
of a cylindrical resonant cavity from an infinite number of quarter-wave sections
of transmission line. In figure 1-59A the 1/4λ section is shown to be equivalent
to a resonant circuit with a very small amount of inductance and capacitance. Three
1/4λ sections are joined in parallel in figure 1-59B. Note that although the current-carrying
ability of several 1/4λ sections is greater than that of any one section, the resonant
frequency is unchanged.

Figure 1-59A. - Development of a cylindrical resonant cavity.
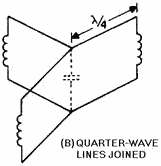
Figure 1-59B - Development of a cylindrical resonant cavity.
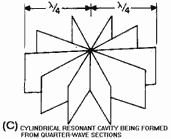
Figure 1-59C - Development of a cylindrical resonant cavity.
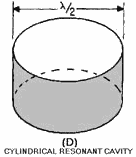
Figure 1-59D - Development of a cylindrical resonant cavity.
This occurs because the addition of inductance in parallel lowers the total inductance,
but the addition of capacitance in parallel increases the total capacitance by the
same proportion. Thus, the resonant frequency remains the same as it was for one
section. The increase in the number of current paths also decreases the total resistance
and increases the Q of the resonant circuit. Figure 1-59C shows an intermediate
step in the development of the cavity. Figure 1-59D shows a completed cylindrical
resonant cavity with a diameter of 1/2λ at the resonant frequency.
Quarter-Wave Section Equivalent to LC Circuit
Refer to Figure 1-59B.
Quarter-Wave Lines Joined
Refer to Figure 1-59C.
Cylindrical Resonant Cavity Being Formed from Quarter-Wave Sections
Refer to Figure 1-59D.
Cylindrical Resonant Cavity
There are two variables that determine the primary frequency of any resonant
cavity. The first variable is PHYSICAL SIZE. In general, the smaller the cavity,
the higher its resonant frequency. The second controlling factor is the SHAPE of
the cavity. Figure 1-60 illustrates several cavity shapes that are commonly used.
Remember from the previously stated definition of a resonant cavity that any completely
enclosed conductive surface, regardless of its shape, can act as a cavity resonator.
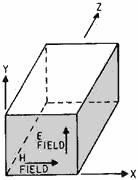
Figure 1-61 - Rectangular cavity resonator.
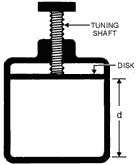
Figure 1-62. - Cavity tuning by volume.
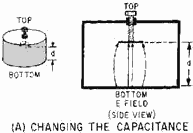
Figure 1-63A - Methods of changing the resonant frequency of
a cavity.
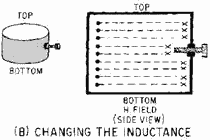
Figure 1-63B - Methods of changing the resonant frequency of
a cavity.
Cavity resonators are energized in basically the same manner as waveguides and
have a similar field distribution. If the cavity shown in figure 1-61 were energized
in the TE mode, the electromagnetic wave would reflect back and forth along the
Z axis and form standing waves. These standing waves would form a field configuration
within the cavity that would have to satisfy the same boundary conditions as those
in a waveguide. Modes of operation in the cavity are described in terms of the fields
that exist in the X, Y, and Z dimensions. Three subscripts are used; the first subscript
indicates the number of 1/2λ along the X axis; the second subscript indicates the
number of 1/2λ along the Y axis; and the third subscript indicates the number of
1/2λ along the Z axis.
Energy can be inserted or removed from a cavity by the same methods that are used to couple energy into and out of waveguides. The operating principles of probes,
loops, and slots are the same whether used in a cavity or a waveguide. Therefore,
any of the three methods can be used with cavities to inject or remove energy.
The resonant frequency of a cavity can be varied by changing any of three parameters:
cavity volume, cavity capacitance, or cavity inductance. Changing the frequencies
of a cavity is known as TUNING. The mechanical methods of tuning a cavity may vary
with the application, but all methods use the same electrical principles.
A mechanical method of tuning a cavity by changing the volume (VOLUME TUNING)
is illustrated in figure 1-62. Varying the distance d will result in a new resonant
frequency because the inductance and the capacitance of the cavity are changed by
different amounts. If the volume is decreased, the resonant frequency will be higher.
The resonant frequency will be lower if the volume of the cavity is made larger.
Capacitive Tuning
of a cavity is shown in figure 1-63A. An adjustable slug or screw is placed in
the area of maximum E lines. The distance d represents the distance between two
capacitor plates. As the slug is moved in, the distance between the two plates becomes
smaller and the capacitance increases. The increase in capacitance causes a decrease
in the resonant frequency. As the slug is moved out, the resonant frequency of the
cavity increases.
Changing the Capacitance
Refer to Figure 1-63A
Changing the Inductance
INDUCTIVE TUNING is accomplished by placing a nonmagnetic slug in the area of
maximum H lines, as shown in figure 1-63B. The changing H lines induce a current
in the slug that sets up an opposing H field. The opposing field reduces the total
H field in the cavity, and therefore reduces the total inductance. Reducing the
inductance, by moving the slug in, raises the resonant frequency. Increasing the
inductance, by moving the slug out, lowers the resonant frequency.
Resonant cavities are widely used in the microwave range, and many of the applications
will be studied in chapter 2. For example, most microwave tubes and transmitting
devices use cavities in some form to generate microwave energy. Cavities are also used to determine the frequency of the energy traveling in a waveguide, since conventional
measurement devices do not work well at microwave frequencies.
Q-50. What two variables determine the primary frequency of a resonant cavity?
Q-51. Energy can be inserted or removed from a cavity by what three methods?
Q-52. Inductive tuning of a resonant cavity is accomplished by placing a nonmagnetic
slug in what area?
Waveguide Junctions
You may have assumed that when energy traveling down a waveguide reaches a junction,
it simply divides and follows the junction. This is not strictly true. Different
types of junctions affect the energy in different ways. Since waveguide junctions
are used extensively in most systems, you need to understand the basic operating
principles of those most commonly used.
The T JUNCTION is the most simple of the commonly used waveguide junctions. T
junctions are divided into two basic types, the E-TYPE and the H-TYPE. HYBRID JUNCTIONS
are more complicated developments of the basic T junctions. The MAGIC-T and the
HYBRID RING are the two most commonly used hybrid junctions.
E-TYPE T JUNCTION. - An E-type T junction is illustrated in figure 1-64, view
(A). It is called an E-type T junction because the junction arm extends from the
main waveguide in the same direction as the E field in the waveguide.
Pages 1-51 through 1-60
| - |
Matter, Energy,
and Direct Current |
| - |
Alternating Current and Transformers |
| - |
Circuit Protection, Control, and Measurement |
| - |
Electrical Conductors, Wiring Techniques,
and Schematic Reading |
| - |
Generators and Motors |
| - |
Electronic Emission, Tubes, and Power Supplies |
| - |
Solid-State Devices and Power Supplies |
| - |
Amplifiers |
| - |
Wave-Generation and Wave-Shaping Circuits |
| - |
Wave Propagation, Transmission Lines, and
Antennas |
| - |
Microwave Principles |
| - |
Modulation Principles |
| - |
Introduction to Number Systems and Logic Circuits |
| - |
- Introduction to Microelectronics |
| - |
Principles of Synchros, Servos, and Gyros |
| - |
Introduction to Test Equipment |
| - |
Radio-Frequency Communications Principles |
| - |
Radar Principles |
| - |
The Technician's Handbook, Master Glossary |
| - |
Test Methods and Practices |
| - |
Introduction to Digital Computers |
| - |
Magnetic Recording |
| - |
Introduction to Fiber Optics |
| Note: Navy Electricity and Electronics Training
Series (NEETS) content is U.S. Navy property in the public domain. |
Related Pages on RF Cafe
Posted July 28, 2021
|


