Module 16 - Introduction to Test Equipment
Pages i,
1-1,
1-11,
1-21,
2-1,
2-11,
2-21,
3-1,
3-11,
3-21,
3-31,
4-1,
4-11,
4-21,
5-1,
5-11,
5-21,
5-31,
6-1,
6-11,
6-21,
6-31,
6-41, Index
The same amount of
current must always be used to deflect the pointer to a certain position on the scale (midscale position, for
example), regardless of the multiplication factor being used. Since the multiplier resistors are of different
values, you must always "zero" the meter for each multiplication scale selected. When selecting a range on the
ohmmeter, select the one that will result in the pointer coming to rest as close to the midpoint of the scale as
possible. This will enable you to read the resistance more accurately because scale readings are more easily
interpreted at or near midpoint. The Megohmmeter An ordinary ohmmeter cannot be used for measuring multimillion ohm values of resistances, such as those in conductor insulation. To test for such
insulation breakdown, you need to use a much higher potential than that supplied by the battery of an ohmmeter.
This potential is placed between the conductor and the outside of the insulation. a megger (megohmmeter) is used
for these tests. The megger, shown in figure 3-15, is a portable instrument consisting of two main elements: (1) a
hand-driven dc generator, which supplies the necessary voltage for making the measurement, and (2) the instrument
portion, which indicates the value of the resistance you are measuring. The instrument portion is of the
opposed-coil type, as shown in view A. Coils a and b are mounted on movable member c. a fixed angular relationship
exists between coils, and they are free to turn as a unit in a magnetic field. Coil b tends to move the pointer
counterclockwise, and coil a tends to move it clockwise.
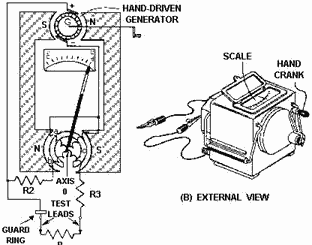
Figure 3-15. - Megger internal circuit and external view. Coil a is connected in series with R3 and unknown resistance Rx. The combination of coil a, R3, and Rx
forms a direct series path between the + and - brushes of the dc generator. Coil b is connected in series with R2,
and this combination is also connected across the generator. Notice that the movable member (pointer) of the
instrument portion of the megger has no restoring springs. Therefore, when the generator is not being operated,
the pointer will float freely and may come to rest at any position on the scale.
3-21
The guard ring, shown in view a of figure 3-15, shunts any leakage currents to the negative side of
the generator. This prevents such current from flowing through coil a and affecting the meter reading.
Q-24. What is the purpose of the guard ring in a megohmmeter? If the test leads are open, no current
will flow in coil a. However, current will flow internally through coil b and deflect the pointer to infinity.
This reading indicates a resistance too large to measure. When a resistance, such as Rx, is connected between the
test leads, current also flows in coil a; the pointer tends to move clockwise. At the same time, coil b still
tends to move the pointer counterclockwise. Therefore, the moving element, composed of both coils and the pointer,
comes to rest at a position in which the two forces are balanced. This position depends upon the value of Rx,
which controls the amount of the current in coil a. Because changes in voltage affect both coils in the same
proportion, the position of the moving element is independent of the voltage. If you short the test leads
together, the pointer will come to rest at zero because the current in coil a is relatively large. Since R3 limits
the current, the instrument will not be damaged under these circumstances. The external appearance of one type of
megger is shown in view B of figure 3-15.
Most meggers you will use are rated at 500 volts; however, there are other types. Meggers are usually equipped
with friction clutches, which are designed to slip if the generator is cranked faster than its rated speed. This
prevents the generator speed and output voltage from exceeding rated values. A 1,000-volt generator is
available for extended ranges. When an extremely high resistance, such as 10,000 megohms or more, is to be
measured, a high voltage is needed to cause enough current flow to actuate the meter movement.
Caution
When using a megger, you can easily be injured or damage equipment if you do not observe
the following MINIMUM safety precautions:
· use meggers on high-resistance measurements only (such as insulation measurements or to check two
separate conductors on a cable).
· Never touch the test leads while the handle is being cranked.
· De-energize and discharge the circuit completely before connecting a megger.
· Whenever
possible, disconnect the component being checked from other circuitry before using a megger Q-25.
Most meggers you will use are rated at what voltage? Q-26. The development of excessive test
voltages is avoided by the use of meggers equipped with what device?
ELECTRODYNAMOMETER-TYPE METERS The electrodynamometer-type meter differs from the galvanometer types we have just studied in that two
fixed coils are used to produce the magnetic field instead of a permanent magnet. Two movable coils are also used
in the electrodynamometer meter. The electrodynamometer meter is most commonly found in various types of power
meters.
3-22
Q-27. What components in an electrodynamometer-type meter movement produce the magnetic field?
As shown in figure 3-16, the fixed coils are connected in series and positioned coaxially (in line) with a space
between them. The two movable coils are also positioned coaxially and are connected in series. The two pairs of
coils (fixed pair and movable pair) are also connected in series with each other. The movable coil is
pivot-mounted between the fixed coils. The main shaft on which the movable coils are mounted is restrained by
spiral springs that restore the pointer to zero when no current is flowing through the coil. These springs also
act as conductors for delivering current to the movable coils. Since these conducting springs are very small, the
meter cannot carry a high value of current.
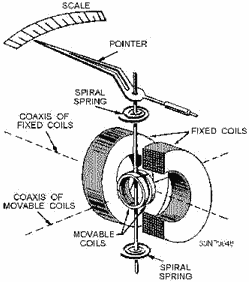
Figure 3-16. - Internal construction of an electrodynamometer. Q-28. What is the limiting factor as to the amount of current an electrodynamometer meter movement can
handle? METER ACCURACY The meter is mechanically damped by means of aluminum
vanes that move in enclosed air chambers. Although very accurate, electrodynamometer-type meters do not have the
sensitivity of the D'Arsonval-type meter movement. For this reason, you will not find them used outside of the
laboratory environment to a large extent. METER MOVEMENT The primary advantage of
the electrodynamometer-type meter movement is that it can be used to measure alternating as well as direct
current. If you apply alternating current to the standard galvanometer-type meter, it will not produce a usable
reading. Instead, the meter will vibrate at or near the zero reading. On one-half cycle of the ac, the meter is
deflected to the left and on the other half cycle
3-23
to the right. Since the frequencies you will be measuring are 60 hertz or greater, the meter is incapable of
mechanically responding at this speed. The result is simply a vibration near the zero point; in addition, no useful reading of voltage or current is obtained. This problem does not exist with the electrodynamometer-type
movement. Current flow through the stationary (fixed) coils sets up a magnetic field. Current flow through the
moving coils sets up an opposing magnetic field. With two magnetic fields opposing, the pointer deflects to the
right. If the current reverses direction, the magnetic fields of both sets of coils will be reversed. With both
fields reversed, the coils still oppose each other, and the pointer still deflects to the right. Therefore, no
rectifying devices are required to enable the electrodynamometer meter movement to read both ac and dc. Rectifying
devices are required for the D'Arsonval-type meter movement to enable it to be used for measuring ac voltages and
currents. Q-29. What is the primary advantage of the electrodynamometer-type meter over the
D'Arsonval-type meter? VOLTMETER
When an electrodynamometer is used as a voltmeter, no problems in construction are encountered because the current
required is not more than 0.1 ampere. This amount of current can be handled easily by the spiral springs. When the
electrodynamometer is used as a voltmeter, its internal connections and construction are as shown in view a of
figure 3-17. Fixed coils a and b are wound of fine wire since the current flow through them will not exceed 0.1
ampere. They are connected directly in series with movable coil c and the series current-limiting resistor.
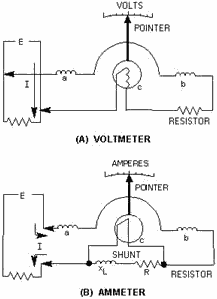
Figure 3-17. - Circuit arrangement of electrodynamometer for use as a voltmeter and an ammeter.
3-24
AMMETER When the electrodynamometer is used as an ammeter, a special type of
construction must be used. This is because the large currents that flow through the meter cannot be carried
through the moving coils. In the ammeter in view B of figure 3-17, stationary coils a and b are wound of heavier
wire to carry up to 5.0 amperes. An inductive shunt (XL) is wired in parallel with the moving coils and permits
only a small part of the total current to flow through the moving coil. The current flowing through the moving
coil is directly proportional to the total current flowing through the instrument. The shunt has the same ratio of
reactance to resistance as the moving coil does. Therefore, the instrument will be reasonably correct at
frequencies at which it is used if ac currents are to be measured. WATTMETER
Electric power is measured by means of a wattmeter. This instrument is of the electrodynamometer type. As shown in
figure 3-18, it consists of a pair of fixed coils, known as current coils, and a moving coil, called the voltage
(potential) coil. The fixed current coils are wound with a few turns of a relatively large conductor. The voltage
coil is wound with many turns of fine wire. It is mounted on a shaft that is supported in jeweled bearings so that
it can turn inside the stationary coils. The movable coil carries a needle (pointer) that moves over a suitably
graduated scale. Coil springs hold the needle at the zero position in the absence of a signal.
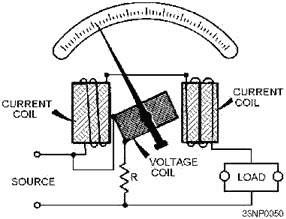
Figure 3-18. - Simplified electrodynamometer wattmeter circuit. Wattmeter Connection The current coil of the wattmeter is connected in series
with the circuit (load), and the voltage coil is connected across the line. When line current flows through the
current coil of a wattmeter, a field is set up around the coil. The strength of this field is in phase with and
proportional to the line current. The voltage coil of the wattmeter generally has a high-resistance resistor
connected in series with it. The purpose for this connection is to make the voltage-coil circuit of the meter as
purely resistive as possible. As a result, current in the voltage circuit is practically in phase with line
voltage. Therefore, when voltage is
3-25
impressed on the voltage circuit, current is proportional to and in phase with the line voltage.
Figure 3-19 shows the proper way to connect a wattmeter into a circuit.
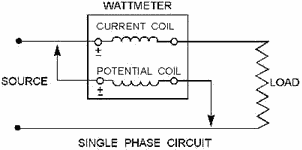
Figure 3-19. - Wattmeter connection. Wattmeter Errors Electrodynamic wattmeters are subject to errors arising from
such factors as temperature and frequency. For example, heat through the coils eventually causes the small springs
attached to the pointer to lengthen and lose tension, which produces deflection errors. Large currents through the
wattmeter also produce a noticeable deflection error. These errors are caused by the heat (I2R) loss through coils
from the application of high currents. Because of this, the maximum current range of electrodynamic wattmeters is
normally restricted to approximately 20 amperes. The voltage range of wattmeters is usually limited to several
hundred volts because of heat dissipation within the voltage circuit. However, the voltage range can be extended
by the use of voltage multipliers. Good-quality, portable wattmeters usually have an accuracy of 0.2 to
0.25 percent. You must remember, though, that electrodynamic wattmeter errors increase with frequency. For the
higher frequency and power ranges, special types of wattmeters are made specifically for those ranges. We will
discuss two such wattmeters in chapter 5 of this module. Wattmeter Overloads The
wattmeter consists of two circuits, either of which will be damaged if too much current passes through them. You
should be especially aware of this fact because the reading on the instrument will not tell you whether or not the
coils are being overheated. If an ammeter or voltmeter is overloaded, the pointer will indicate beyond the upper
limit of its scale. In the wattmeter, both the current and potential circuit may carry such an overload that their
insulations burn; yet the pointer may be only part of the way up the scale. This is because the position of the
pointer depends upon the power factor of the circuit as well as upon the voltage and current. Therefore, a low
power-factor circuit will provide a very low reading on the wattmeter. The reading will be low, even when the
current and voltage circuits are loaded to the maximum safe limit. The safe rating for each wattmeter is always
distinctly rated, not in watts, but in volts and amperes.
3-26
TECHNIQUES for METER use We have considered the more common meters; now let's consider some of the techniques employed in their use. The techniques suggested here are not all-inclusive. You will find, as you develop your technical skills,
other variations and techniques in use. Consider the techniques for measuring current in a circuit. You can
accomplish this by placing an ammeter in series with the circuit or by measuring the voltage across a resistor of
known value and using Ohm's law to figure current. This last technique has the advantage of eliminating the
necessity of opening the circuit to connect the ammeter. CONTINUITY TESTS Open
circuits are those in which the flow of current is interrupted by a broken wire, defective switch, or any means by
which the current cannot flow. The test used to detect open circuits (or to see if the circuit is complete or
continuous) is continuity testing. An ohmmeter (which contains its own batteries) is excellent for use in
a continuity test. Normally, continuity tests are performed in circuits where the resistance is very low, such as
the resistance of a copper conductor. An open is indicated in these circuits by a very high or infinite resistance
between two continuously connected points.
Figure 3-20 shows a continuity test of a cable that connects two electronic units. Notice that both plugs are
disconnected and the ohmmeter is in series with conductor D under test. The power should be off. When checking
conductors A, B, and C (connection of ohmmeter to conductors not shown), the current from the ohmmeter flows
through plug 2 (female) through conductor A, B, or C to plug 1 (female). From plug 1, current passes through the
jumper to the chassis, which is "grounded" to the ship's structure. The metal structure serves as the return path
to the chassis of unit 2 and completes the circuit through the series-connected ohmmeter. The ohmmeter indicates a
low resistance because no break exists in conductors A, B, or C. However, checking conductor D reveals an open.
The ohmmeter is shown indicating maximum resistance because current cannot flow in an open circuit. With an open
circuit, the ohmmeter needle is all the way to the left since it is a series-type ohmmeter (reads right to left).
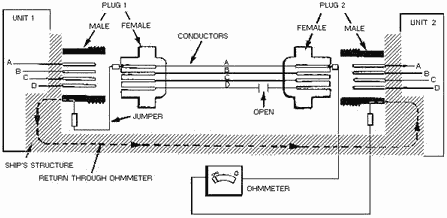
Figure 3-20. - Continuity test.
3-27
Where conditions are such that the ship's structure cannot be used as the return path, one of the
other conductors (known to be good) may be used. For example, to check D, you can connect a jumper from pin D
to pin a of plug 1 (female) and the ohmmeter leads to pins D and a of plug 2 (female). This technique will also
reveal the open in the circuit. TESTING for Grounds Grounded circuits are caused
by some conducting part of the circuit making contact either directly or indirectly with the metallic structure of
the ship. Grounds can have many causes. The two most common are the fraying of insulation from a wire and
moisture-soaked insulation. The fraying of insulation from a wire allows bare wire to come into contact with the
metal ground. Moisture-soaked insulation causes reduced insulation resistance (also classified as a ground).
Grounds are usually indicated by blown fuses or tripped circuit breakers. Blown fuses or tripped circuit breakers,
however, can also result from a short circuit other than a ground. a high-resistance ground can also occur when
current is increased significantly but not enough to rupture the fuse or trip the circuit breaker.
Caution
Before testing any circuit, ensure the circuit under test has been de-energized and
checked with a safety shorting probe. In testing for grounds, you may use a megger or an ohmmeter. Measuring the resistance to ground from
points in a circuit determines if the point is grounded. Referring again to figure 3-20, you can see one possible
means of testing a cable for grounds. If the jumper is removed from pin D of plug 1 (female), a test for ground
can be made for each conductor in the cable. You can do this by connecting one meter lead to ground and the other
to each of the pins of either of the plugs. a low resistance indicates that some part of that conductor or one of
the plug assemblies is grounded. Both plugs must be removed from their units; if only one plug is removed, a false
indication is possible because a conductor may be grounded through the unit. TESTING for ShortS
a short circuit, other than a grounded one, is one where two conductors touch each other directly or through
another conducting element. Two conductors with frayed insulation may touch and cause a short. Too much solder on
the pin of a connector may short to the adjacent pin. In a short circuit, enough current may or may not flow to
blow a fuse or open a circuit breaker. a short may occur between two cables carrying signals but might not be
indicated by a blown fuse. Shorts occur in many components, such as transformers, motor windings, and
capacitors. The major test method used to detect shorts in such components is to measure resistance. The indicated
resistance is then compared with the resistance given on schematics or in the equipment technical manuals to
determine whether the measured value is within specifications. An ohmmeter is the device used to check for
shorts. You can use the ohmmeter to detect a short between two conductors by measuring the resistance between them
(be sure electrical power has been disconnected). a low resistance reading indicates a short. You can test the
circuit in figure 3-20 for a short by first removing the jumper and disconnecting both plugs; you then measure the
resistance between the two suspended conductors.
3-28
Warning
The following section discusses voltage measurements on live circuits. BE SURE YOU
ALWAYS FOLLow PRESCRIBED Safety RULES When MEASURING VoltageS. Voltage TESTS Voltage tests must be made with the power applied; therefore, the
prescribed safety precautions must be followed to prevent injury to personnel and damage to the equipment. You
will find in your maintenance work that the voltage test is of utmost importance. It is used not only in isolating
casualties to major components but also in the maintenance of subassemblies, units, and circuits. Before checking
a circuit voltage, you should check the voltage of the power source to be sure that the normal voltage is being
applied to the circuit. The voltmeter is used for voltage tests. In using the voltmeter, make certain that
the meter used is designed for the type of current (ac or dc) to be tested and has a scale with a suitable range.
Since defective parts in a circuit can cause higher than normal voltages to be present at the point of test, the
highest voltmeter range available should be used first. Once you have obtained a reading, determine if a lower
scale can be used that will cause no damage to the meter movement. If so, use the lower scale. This provides a
more accurate reading.
Another consideration in the circuit voltage test is the resistance and current in the circuit. a low resistance
in a high-current circuit could result in considerable voltage drop, whereas the same resistance in a low-current
circuit may be minimal. Abnormal resistance in part of a circuit can be checked with either an ohmmeter or a
voltmeter. Where practical, an ohmmeter should be used because the test is then carried out with a "dead" circuit.
The majority of the electronic circuits you will encounter in equipment will be low-current circuits, and most
voltage readings will be direct current. Also, many of the schematics will indicate the voltages at various test
points. Therefore, if you suspect that a certain stage is defective, you can check the voltage by connecting a
voltmeter from the test point to ground. If the suspected stage is not defective, the voltmeter readings should
match the voltages given on the schematic. Some technical manuals also contain voltage charts on which all
the voltage measurements are tabulated. These charts usually indicate the sensitivity of the meter (for example,
20,000 ohms/volt) used to obtain the voltage readings for the chart. To obtain comparable results, you must use a
voltmeter of the same sensitivity (or greater) as that specified. Make certain that the voltmeter is not "loading"
the circuit while taking a measurement. If the meter resistance is not considerably higher than the circuit
resistance, the reading will be markedly lower than the true circuit voltage because of the voltmeter's loading
effect. (To calculate meter resistance, multiply the rated ohms-per-volt sensitivity value of the meter by the
scale in use. For example, a 1,000-ohms-per-volt meter set to the 300-volt scale will have a resistance of
300,000 ohms.) Resistance TESTS
Before checking the resistance of a circuit or of a part, make certain that the power has been turned off. Also
make sure capacitors in the associated circuit are fully discharged. To check continuity, always use the lowest
ohmmeter range. If the highest range is used, the meter may indicate zero, even though appreciable resistance is
present in the circuit. Conversely, to check a high resistance, use the highest scale since the lower range scale
may indicate infinity, even though the resistance is less than a megohm. In making resistance tests, you must
remember that even though the external ohmmeter leads are
3-29
connected in parallel with the circuit to be measured, the internal meter circuitry is electrically
connected in series. In making resistance tests, take into account that other circuits containing
resistances and capacitances may be in parallel with the circuit to be measured. Erroneous conclusions may be
drawn from readings obtained in such cases. Remember, a capacitor blocks the dc flow from the ohmmeter. To obtain
an accurate reading when other parts are connected across the suspected circuit, disconnect one end of the circuit
to be measured from the equipment. For example, many of the resistors in major components and subassemblies are
connected across transformer windings. To obtain a valid resistance measurement, you must isolate the resistors to
be measured from the shunt resistances of the coils of the transformers. Resistance tests are also used to
check a component for grounds. In these tests, the component to be tested should be disconnected from the rest of
the circuit so that no normal circuit ground will exist. Dismounting the component to be checked is not necessary.
The ohmmeter is set for a high-resistance range. Then the ohmmeter is connected between ground and each
electrically separate circuit of the component being tested. Any resistance reading less than infinity indicates
at least a partial ground. You can also check capacitors suspected of being short-circuited by measuring the
resistance. To check a capacitor suspected of being open, temporarily shunt a known good capacitor then recheck
the performance of the circuit.
Caution
To avoid possible damage to equipment during resistance tests, observe the following
precautions:
· Always connect an ammeter in series - never in parallel.
· Connect a voltmeter in parallel.
· Never connect an ohmmeter to a live circuit.
· Observe polarity when using a dc ammeter or a
dc voltmeter.
· View meters directly from the front. When viewed from an angle off to the side, an
incorrect reading will result because of OPTICAL PARALLAX. (Parallax was covered in NEETS, Module 3, Introduction
to Circuit Protection, Control, and Measurement.)
· Always choose an instrument suitable for the
measurement desired.
· Select the highest range first and then switch to the proper range.
· In using a meter, choose a scale that will result in an indication as near midscale as possible.
· Do not mount or use instruments in the presence of a strong magnetic field.
· Remember, a
low internal resistance voltmeter (low sensitivity) may shunt the circuit being measured and result in incorrect
readings.
3-30
| - |
Matter, Energy,
and Direct Current |
| - |
Alternating Current and Transformers |
| - |
Circuit Protection, Control, and Measurement |
| - |
Electrical Conductors, Wiring Techniques,
and Schematic Reading |
| - |
Generators and Motors |
| - |
Electronic Emission, Tubes, and Power Supplies |
| - |
Solid-State Devices and Power Supplies |
| - |
Amplifiers |
| - |
Wave-Generation and Wave-Shaping Circuits |
| - |
Wave Propagation, Transmission Lines, and
Antennas |
| - |
Microwave Principles |
| - |
Modulation Principles |
| - |
Introduction to Number Systems and Logic Circuits |
| - |
- Introduction to Microelectronics |
| - |
Principles of Synchros, Servos, and Gyros |
| - |
Introduction to Test Equipment |
| - |
Radio-Frequency Communications Principles |
| - |
Radar Principles |
| - |
The Technician's Handbook, Master Glossary |
| - |
Test Methods and Practices |
| - |
Introduction to Digital Computers |
| - |
Magnetic Recording |
| - |
Introduction to Fiber Optics |
| Note: Navy Electricity and Electronics Training
Series (NEETS) content is U.S. Navy property in the public domain. |
|


