Module 16 - Introduction to Test Equipment
Pages i,
1-1,
1-11,
1-21,
2-1,
2-11,
2-21,
3-1,
3-11,
3-21,
3-31,
4-1,
4-11,
4-21,
5-1,
5-11,
5-21,
5-31,
6-1,
6-11,
6-21,
6-31,
6-41, Index
The output circuit of the
RF signal generator usually contains a calibrated attenuator and an output level meter. The output level meter
provides an indication and permits control of the output voltage of the generator. The attenuator allows you to
select the amount of this output. The attenuator is made up of a group of resistors that form a voltage-dropping
circuit.
It is controlled by a control calibrated in microvolts. When the control is adjusted so that the output
meter reads unity (1.0), the reading on the attenuator control gives the exact value (no multiplication factor) of
the output in microvolts. If an output voltage at a lower value is desired, the attenuator control is varied until
the meter indicates some decimal value less than 1. This decimal is multiplied by the attenuator reading to give
the actual output in microvolts. An RF signal generator currently in wide use by the Navy is the HP 8640B
(figure 5-8). The HP 8640B signal generator covers the frequency range of 500 kilohertz to 512 megahertz, and can
be extended to 1,024 MHz by using adapters.
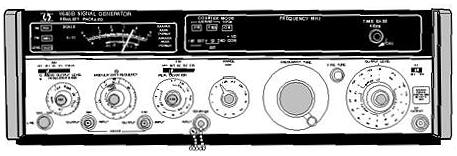
Figure 5-8. - Rf signal generator (HP-model 8640B). This completes our discussion of signal generators. The following section deals with an instrument
that measures frequency - the Frequency COUNTER.
Frequency COUNTERS The signal generators you studied in the previous section provide signals for use in testing, aligning,
and troubleshooting electronic equipment. Now, we will study the Frequency COUNTER, an instrument that measures
frequencies. Frequency counters are used to measure frequencies already in existence. An example of a typical
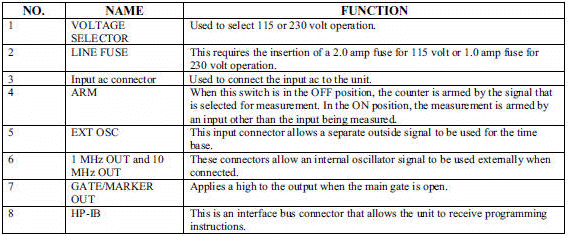
frequency counter, the model 5328A, is shown in figure 5-9.
5-11
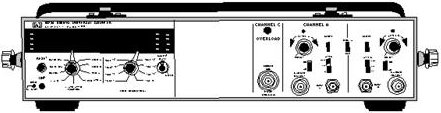
Figure 5-9. - Model 5328A 500 MHz universal frequency counter. GENERAL DESCRIPTION of The Frequency COUNTER The following description is for
the model 5328A counter only. Other counters use different techniques to derive the displayed frequency. The
outputs available vary from counter to counter. For further information on other types of counters and their uses,
refer to EIMB, Test Equipment, NAVSEA 0967-LP-000-0040. The model 5328A is a portable, solid-state
electronic frequency counter. It is used to precisely measure and display, using a nine-digit LED readout,
frequency, period, period average, time interval, time interval average, and ratio of electronic frequency
signals. This frequency counter can also provide a 1-MHz and 10-MHz output signal through the back-panel BNC.
Q-6. What frequencies are provided through the back-panel BNC? The model 5328A frequency counter can be divided into four major internal subsections: the main counter
section, input section, power supply, and interface bus section. Additionally, two separate (front panel) input
channels provide for time interval measurements. Each channel has an attenuator, trigger slope selector, level
control, ac or dc coupling, and an oscilloscope marker output. a third input channel is provided to allow the
measurement of 30 MHz to 500 MHz with a maximum input of 5 volts rms with a fused-protected connection.
Front-panel controls are provided for you to do the function selection, frequency resolution, sample rate, and
reset display. Also, a push-button control on the front panel allows the unit to be used in the operational or
standby mode (power applied to the crystal oven to eliminate warm-up). Rear-panel connectors provide the gated
output frequencies and an input for an external frequency standard. a detachable front cover is used to store
accessory cables and connectors. Controls and Indicators Figures 5-10 and 5-11
show all the front- and rear-panel operating controls and indicators. Refer to tables 5-1 and 5-2 for a
description of each of the numbered controls and connectors shown in figures 5-10 and 5-11, respectively.
5-12
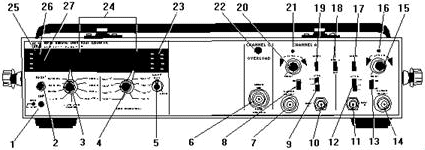
Figure 5-10. - Front-panel controls and indicators.
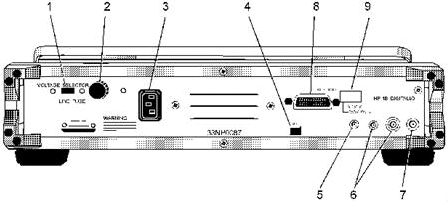
Figure 5-11. - Rear-panel controls and connectors.
5-13
Table 5-1. - Front Panel Controls and Connectors
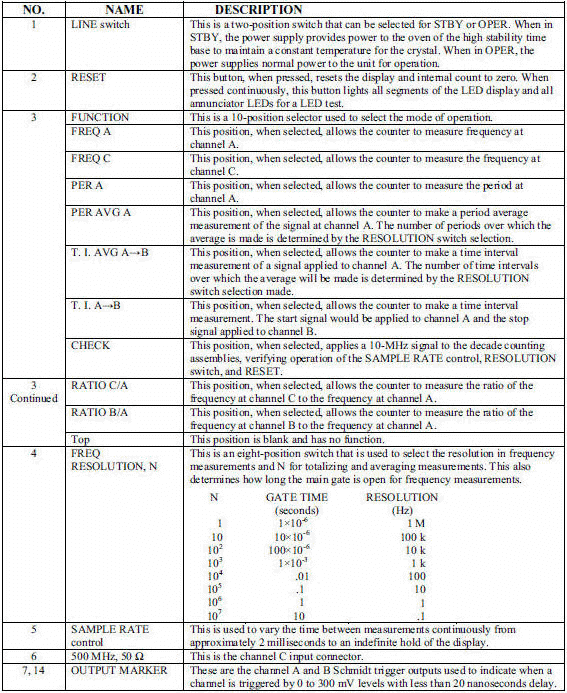
5-14
Table 5-1. - Front Panel Controls and Connectors - Continued
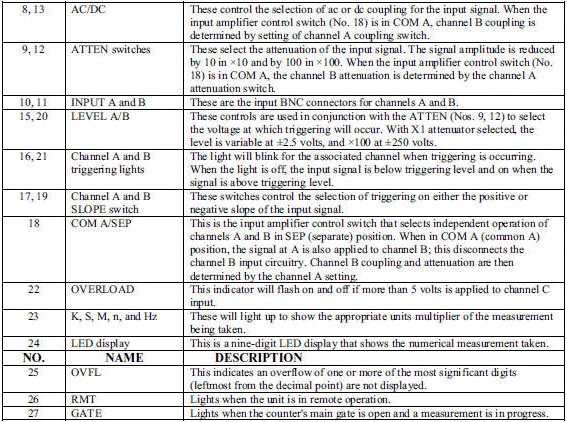
Table 5-2. - Rear-Panel Controls and Connectors
5-15
Frequency Measurement As discussed previously, the model 5328A frequency
counter is capable of measuring frequency, time period (inverse of frequency), ratio, and time interval. We will
start with frequency. When the Function selector is in the FREQ a or FREQ C position, the counter measures the
frequency, f, by accumulating the number of cycles, n, of the input signal that occurs over the time period, t.
This is expressed by:

The basic counter elements necessary to perform this measurement are shown in figure 5-12. The Input
Amplifier/TRIGGER essentially conditions the input signal to a format that is compatible with the internal
circuitry of the counter. As figure 5-12 indicates, the output of the amplifier/trigger corresponds directly to
the input signal.
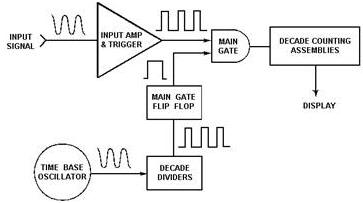
Figure 5-12. - Basic elements of the frequency counter. The TIME Base Oscillator is a 10-MHz temperature-controlled (oven-regulated) precision, crystal
oscillator used for the time base element from which time, t, is derived. DECADE DIVIDERS take the time base
oscillator signal as the input and provide a pulse train, whose frequency is variable in decade steps. This
frequency can be controlled by the FREQ RESOLUTION, N switch. The time, t, is determined by the period of this
pulse train. The heart of the counter is the MAIN GATE. When the gate is opened, pulses from the
amplifier/trigger are allowed to pass through. The opening and closing of the main gate is controlled by the
decade divider output to the main gate flip-flop. The output of the MAIN GATE is then sent to the DECADE COUNTING
ASSEMBLIES (DCAs), where the pulses are combined and displayed after the gate is closed. If the Frequency
RESOLUTION, N selection switch, is set for 10 6, the main gate is open for 1 second, and the decade counting
assemblies display the frequency of the input signal in hertz (refer to figure 5-10, Frequency RESOLUTION, N
selection switch).
5-16
Period Measurement Period, the inverse of frequency, can be measured with the
counter by reversing the inputs to the main gate. With the Function selector switch in the PER a position, the
input signal controls the duration over which the main gate is open and the decade divider output is counted by
the DCAs (see figure 5-13). The duration of the count is one cycle or period of the input signal. When the
Function selector is in the PER AVG a position, the unused decades in the decade divider chain are used to divide
the amplifier/trigger output so that the gate remains open for decade steps of each input period rather than a
single period. This is the basis for multiple period averaging. Period and period averaging techniques are used to
increase measurement accuracy on low-frequency measurements.
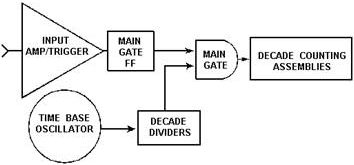
Figure 5-13. - Measuring period. Ratio Measurement Placing the Function selector switch to RATIO C/A OR B/A sets
the counter to measure the ratio of the signal frequency at channel C or B to the signal frequency at channel A.
Using the same configuration as in figure 5-13 and replacing the time base with a second input frequency, f2, you
can measure the ratio of f 2/f. The signal at frequency f can be divided into decade steps in the same manner as
multiple period averaging for higher resolution. Time Interval Measurement
Figure 5-14 illustrates the configuration for the measurement of time between two events or time interval. This is
done by placing the Function selector in the T.I.AVG AB position. The START input opens the main gate, and the
STOP input closes it. The START input is applied to channel A, and the STOP input is applied to channel B. The
decade divider output (clock pulses) is counted, and the display shows the elapsed time between START and STOP
signals, as shown in figure 5-15.
5-17

Figure 5-14. - Basic elements of a time interval counter.

Figure 5-15. - Clock pulses. Resolution The resolution of the measurement is determined by the frequency of
the counted clock (for example, a 10-MHz clock provides 100 ns resolution [see figure 5-10, Frequency RESOLUTION,
N selection switch]). The input amplifier, main gate, and DCAs (elements of the time interval counter) must
operate at speeds consistent with the clock frequency; otherwise the instrument's resolution would be meaningless.
Clock frequencies of 1, 10, and 100 MHz, and other 10n frequencies, are preferred, since the accumulated count,
with the appropriate placement of the decimal point, gives a direct readout of the time interval. This explains
why the conventional time interval counter is presently limited to 10 nanoseconds, a clock frequency of 100 MHz.
One GHz is beyond reach, and a clock frequency of 200 MHz would require some arithmetic processing of the
accumulated count in the DCAs to enable time to be displayed directly.
5-18
Time Interval Averaging The time interval averaging technique is based on the
fact that if the ±1 count error is truly random, it can be reduced by averaging a number of measurements. The
words "truly random" are significant. For time interval averaging to work, the time interval must (1) be
repetitive and (2) have a repetition frequency that is asynchronous to the instrument's clock. Under these
conditions, the resolution of the measurement is:
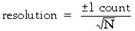
where N = number of time intervals averaged
With averaging, resolution of a time interval measurement is limited only by the noise inherent in the
instrument. The 5328A can obtain 10-picoseconds resolution. Most time interval averaging has one severe
limitation: The clock period limits the minimum measurable time interval. With the Function selector switch in the
T.I. AVG AB position, synchronizers are used to remove this limitation. These synchronizers enable the 5328A to
measure intervals as short as 100 picoseconds. Referring to figure 5-16, note that the input wave shape
shows a repetitive time interval, which is asynchronous to the square wave clock. When these signals are applied
to the main gate, with no synchronizers, an output similar to the third waveform results. Since the DCAs are
designed to count at the clock frequency and are unable to accept pulses of shorter duration than the clock, the
resulting counts accumulated in the DCAs will be in error, as shown in the fourth waveform. This problem is
alleviated by the synchronizers, which are designed to detect leading edges of the clock pulses that occur while
the gate is open. They detect and reconstruct the leading edges, making the pulses applied to the DCAs the same
duration as the clock, as shown in the fifth waveform. Occasionally, when the input time interval repetition is
synchronous with the internal clock, time interval averaging cannot be performed.
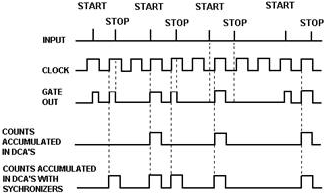
Figure 5-16. - Synchronizer operation with time interval averaging. This ends our discussion on electronic frequency counters. Now, we'll study an area of electronics test
equipment that is becoming more widespread and important each day - the testing of electronic logic
5-19
components. a test instrument of value for any technician who works on digital equipment is the LOGIC
PROBE, which is an integrated circuit-testing device.
INTEGRATED Circuit-TESTING DEVICES Digital integrated circuits are relatively easy to troubleshoot and test because of the limited numbers
of input and output combinations involved in circuits. The two-state conditions in logic circuits are often
referred to as (1) low or high, (2) on or off, or (3) one or zero (1 or 0). Other terminology may also be used. Any particular integrated circuit (IC) can be tested by simply comparing it to a known good one. The LOGIC
PROBE is a device that can be of great value in troubleshooting digital integrated logic circuits. The
ideal logic probe has the following characteristics:
· It will detect a steady logic level.
· It will detect a train of logic levels.
· It will detect an open circuit.
· It
will detect a high-speed transient pulse.
· It will have over-voltage protection.
· It will
be small, light, and easy to handle.
The use of a suitable logic probe can greatly simplify your troubleshooting of logic levels through digital
integrated logic circuitry. It can immediately show you whether a specific point in the circuit is low, high,
open, or pulsing. Some probes have a feature that detects and displays high-speed transient pulses as small as 10
nanoseconds wide. These probes are usually connected directly to the power supply of the device being tested,
although a few have internal batteries. Most IC failures show up in a circuit as a constant high or low
level. Because of this, logic probes provide a quick, inexpensive way of locating the fault. They can also display
the single, short-duration pulse that is hard to detect on an oscilloscope. Figure 5-17 shows a basic logic probe.
5-20
| - |
Matter, Energy,
and Direct Current |
| - |
Alternating Current and Transformers |
| - |
Circuit Protection, Control, and Measurement |
| - |
Electrical Conductors, Wiring Techniques,
and Schematic Reading |
| - |
Generators and Motors |
| - |
Electronic Emission, Tubes, and Power Supplies |
| - |
Solid-State Devices and Power Supplies |
| - |
Amplifiers |
| - |
Wave-Generation and Wave-Shaping Circuits |
| - |
Wave Propagation, Transmission Lines, and
Antennas |
| - |
Microwave Principles |
| - |
Modulation Principles |
| - |
Introduction to Number Systems and Logic Circuits |
| - |
- Introduction to Microelectronics |
| - |
Principles of Synchros, Servos, and Gyros |
| - |
Introduction to Test Equipment |
| - |
Radio-Frequency Communications Principles |
| - |
Radar Principles |
| - |
The Technician's Handbook, Master Glossary |
| - |
Test Methods and Practices |
| - |
Introduction to Digital Computers |
| - |
Magnetic Recording |
| - |
Introduction to Fiber Optics |
| Note: Navy Electricity and Electronics Training
Series (NEETS) content is U.S. Navy property in the public domain. |
|


